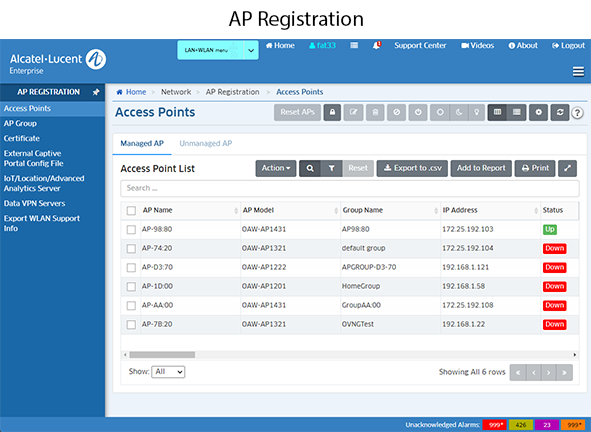
The AP (Access Point) Registration application is used to register Stellar AP Series Devices with OmniVista and configure the APs into AP Groups that can be managed by OmniVista. When Stellar AP Series Devices are connected to the network, the AP automatically contacts, and registers with, the OmniVista Server. OmniVista initially classifies the AP as "unmanaged" and displays it in the Unmanaged Access Point List. At this point, the APs are in an "unmanageable" state. OmniVista is aware of the APs but cannot yet manage them. The Network Admin can review these APs and place them into a "trusted" state where they can be managed by OmniVista.
Stellar AP Series Devices are managed by AP Group. OmniVista does not manage individual APs. The attributes configured for the AP Group (e.g., Management VLAN, RF Profile) are applied to all APs in the group. All APs are initially assigned to the Default AP Group. You can configure additional AP Groups and assign specific APs to them. You configure Stellar AP Series Devices in OmniVista (e.g., Notification traps, Resource Manager backups) by applying the configuration to an AP Group. In OmniVista applications (e.g., Notifications, Resource Manager), rather than presenting the user with individual APs when applying a configuration (as is done with AOS Devices), OmniVista presents the user with the option of applying a configuration to AOS Devices and/or AP Groups. Any configuration applied to an AP Group is applied to all APs in the group.
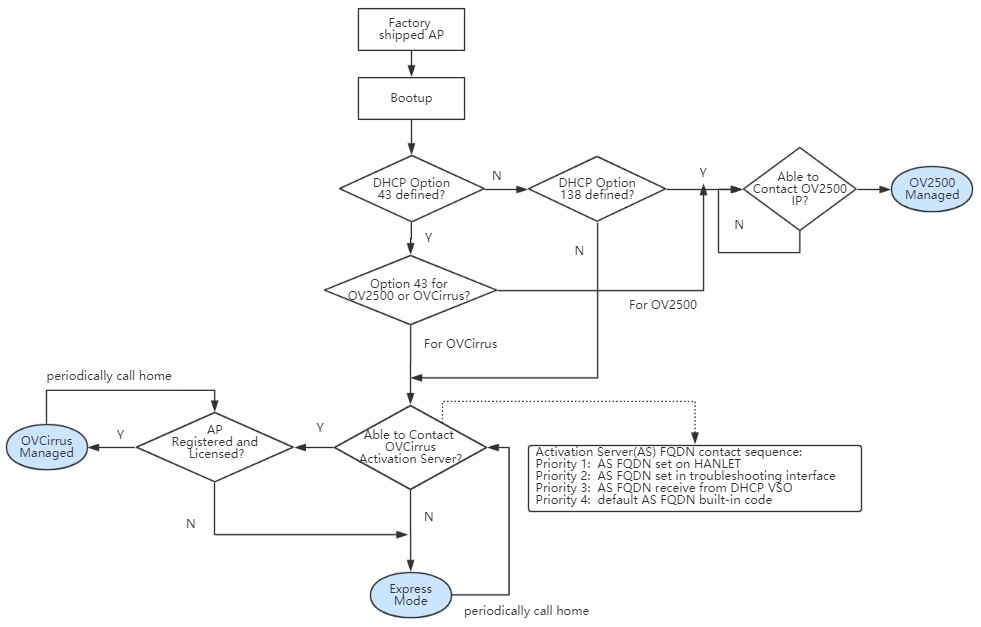
The bootup sequence for APs and the basic workflow for configuring APs for OmniVista Cirrus management is provided below.
Note: APs cannot be managed in OmniVista Cirrus if they are behind an IPv6 Proxy.
The following screens are used to register and configure Stellar AP Series Devices for OmniVista management.
The bootup sequence for Stellar AP Series Device is shown below. The diagram displays the bootup sequence for APs managed in Express Mode as well as APs Managed by OmniVista Cirrus. The workflow for configuring APs for OmniVista Cirrus management is shown in AP Device Management Workflow.
The basic workflow for configuring Stellar AP Series Devices for OmniVista management is shown below.
1. Connect the AP to the network. The AP will contact, and register with, OmniVista and the APs will be displayed in the Unmanaged Access Points List.
2. Go to the Access Points Screen (Network - AP Registration - Access Points) and review the APs in the Unmanaged Access Points List.
3. Place the APs into "Trusted" status. Select the APs, then click on the checkmark icon at the top of the screen to place the APs into "Trusted" status. The APs will appear in the Managed Access Points List. They will also be displayed in the Topology Physical Network Map and Default AP Group Map.
4. All APs are initially placed into the Default AP Group. You can manage the APs using the Default AP Group or you can go to the AP Group Screen to create a new AP Group and move specific APs in the new group. An AP can only belong to one AP Group.
5. To move APs into a new group, go back to the Access Points Screen. Select AP(s) that you want to move and edit the Group Name field to assign them to the new group.
Once an AP(s) is assigned to a group (including the Default AP Group), you can configure the APs in OmniVista (e.g., Notification Traps, Resource Manager Backups) by applying the configuration to the AP Group. In these applications (e.g., Notifications, Resource Manager), rather than presenting the user with individual APs when applying a configuration (as is done with AOS Devices), OmniVista presents the user with the option of applying a configuration to AOS Devices and/or AP Groups. Any configuration applied to an AP Group is applied to all APs in the group.
Note: Stellar APs are connected to a PoE switch and the PoE switch physically connects to a router that provides DHCP service for both AP and WiFi users. If the AP receives Option 43, Sub-Option 1 from the DHCP server specifying ALE as the vendor, the AP will boot up and connect to OmniVista Cirrus for management. When configuring your DHCP Server, specify the ALE Vendor ID "alenterprise" for Option 43, Sub-Option 1 (1:c:61:6c:65:6e:74:65:72:70:72:69:73:65:). For more information, see the Alcatel-Enterprise OmniAccess Stellar User Guide.
When an 802.1X (supplicant) device is connected to a UNP port on which 802.1X authentication is enabled, the switch will attempt to authenticate the device using 802.1X EAP frames. If after a configurable amount of time the device does not respond to the EAP frames sent by the switch, the device is identified as a non-802.1X (non-supplicant) device and undergoes MAC address authentication.
When a Stellar AP is connected to an OmniSwitch UNP port on which the AP Mode and 802.1X authentication is enabled, the switch starts to send EAP frames to the AP device. If the AP device does not respond to the EAP frames, the switch will identify the AP as a non-supplicant and will attempt to authenticate the AP with other methods. To ensure that the switch will identify the AP device as a supplicant (802.1X client), enable 802.1X functionality for the AP Group to which the AP belongs and specify an 802.1X client certificate to install on the APs in the group. A built-in 802.1X client certificate is provided by default or you can generate and upload a custom client certificate.
Note: OAW-AP1101 does not support the AP 802.1X client feature due to low flash size. All other APs, including other low-end APs (OAW-AP1201H, OAW-AP1201L, OAW-AP1201HL), support this feature.
Note: When an AP is operating as an 802.1X client, the AP does not support untagged WLAN/SSID/client and cannot participate in a Mesh deployment.
The following use case examples document the steps for configuring 802.1X authentication for the AP.
An 802.1X (supplicant) AP device can undergo certificate-based (see use cases above) or username-based 802.1X authentication. For username-based authentication, the user/pass = AP MAC address is configured in the UPAM database. When the AP MAC address attempting to authenticate matches the configured user/pass MAC address, UPAM returns a UNP profile/VLAN ID to the switch. This is often done when the user wants to assign a different VLAN based on the authentication result.
Note that when configuring username-based 802.1X authentication, the 802.1X Supplicant option for the AP Group should be set to "Off" and Secure Mode is enabled on the switch port. This will ensure that the switch will learn the AP MAC address and perform the 802.1X authentication according to the configuration (Access Auth Profile) on the switch.
Note: To learn about 802.1x authentication failures where AP is the client, check your RADIUS Server's Authentication Records.