And, Password for Client Key.
Notes:
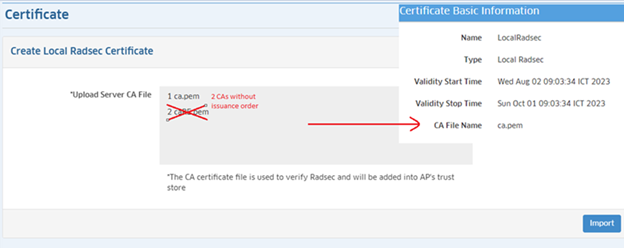
1. Do not import multiple CAs without an issuance order. If you import multiple CAs without an issuance order, OmniVista only parses and applies the first one to the AP.
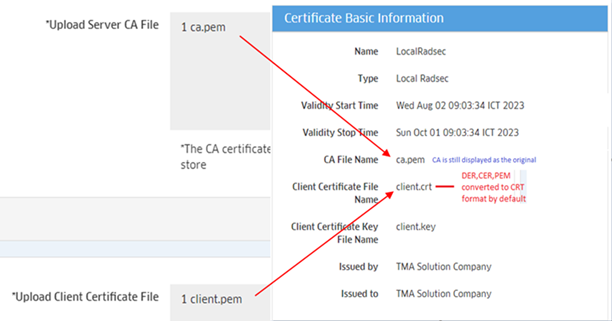
- Upload Server CA File - Click on the Upload button and locate the RadSec CA Certificate. Click on the Import button.
- Upload Client Certificate File - Click on the Upload button and locate the AP Certificate File. Click on the Import button.
- Upload Client Key File - Click on the Upload button and locate the AP Certificate Private Key File. Click on the Import button.
- Name - Enter a Name for the Certificate.
- Private Key Password - Enter a Private Key Password to encrypt the key file when generating the CA File.
- Upload Server CA File - Click on the Upload button and locate the Stellar BLE CA Certificate. Click on the Import button.
- Upload Server File - Click on the Upload button and locate the AP Certificate File. Click on the Import button.
- Upload Client Key File - Click on the Upload button and locate the AP Certificate Private Key File. Click on the Import button.
- Name - Enter a Name for the Certificate.
- Private Key Password - Enter a Private Key Password to encrypt the key file when generating the CA File.
- A CA is generated and uploaded to OmniVista and pushed to the AP by selecting the Syslog Over TLS option in the AP Group.
- A Server Certificate is also created to add to the remote Syslog Server.
- Upload CA File - Click on the Upload button and locate the Syslog Over TLS CA Certificate. Click on the Import button.
- Name - Enter a Name for the Certificate.
- Upload Client CA File - Click on the Upload button and locate the Stellar WIFI RTLS CA Certificate. Click on the Import button.
- Upload Client File - Click on the Upload button and locate the AP Certificate File. Click on the Import button.
- Upload Client Key File - Click on the Upload button and locate the AP Certificate Private Key File. Click on the Import button.
- Name - Enter a Name for the Certificate.
- Private Key Password - Enter a Private Key Password to encrypt the key file when generating the CA File.
- Name - The name of the certificate file.
- Type - The type of certificate (Web Server/External Portal Server).
- Validity Start Time - Validity starting time of the certificate file.
- Validity Stop Time - Validity ending time of the certificate file.
- Format - The format of the certificate file (e.g., .pem).
- Description - User-configured description for the certificate file.
- Issuer - The entity that issued the certificate.
- Serial Number - Serial number of the certificate.
- Name - The name of the certificate file.
- Type - The type of certificate ( Local LDAP).
- Validity Start Time - Validity starting time of the certificate file.
- Validity Stop Time - Validity ending time of the certificate file.
- CA File Name - The name of the CA file.
- Server File Name - The name of the certificate file.
- Key File Name - The name of the key file.
- Issued By- The entity that issued the certificate.
- Issued To - The entity to which the certificate was issued.
- Name - The name of the certificate file.
- Type - The type of certificate (802.1X Client).
- Validity Start Time - Validity starting time of the certificate file.
- Validity Stop Time - Validity ending time of the certificate file.
- AP Certificate File Name - The name of the CA file.
- Key File Name - The name of the key file.
- Name - The name of the certificate file.
- Type - The type of certificate (Local RadSec).
- Validity Start Time - Validity starting time of the certificate file.
- Validity Stop Time - Validity ending time of the certificate file.
- CA File Name - The name of the CA file.
- Client Certificate File Name - The name of the client certificate file.
- Client Certificate Key File Name - The name of the client key file.
- Issued By- The entity that issued the certificate.
- Issued To - The entity to which the certificate was issued.
- Name - The name of the certificate file.
- Type - The type of certificate (Stellar BLE).
- Validity Start Time - Validity starting time of the certificate file.
- Validity Stop Time - Validity ending time of the certificate file.
- Client CA File Name - The name of the CA file.
- Client Certificate File Name - The name of the client certificate file.
- Client Certificate Key File Name - The name of the client key file.
- Issued By- The entity that issued the certificate.
- Issued To - The entity to which the certificate was issued.
- Name - The name of the certificate file.
- Type - The type of certificate (Syslog Over TLS).
- Validity Start Time - Validity starting time of the certificate file.
- Validity Stop Time - Validity ending time of the certificate file.
- CA File Name - The name of the CA file.
- Issued By- The entity that issued the certificate.
- Issued To - The entity to which the certificate was issued.
- Name - The name of the certificate file.
- Type - The type of certificate (Stellar RTLS).
- Validity Start Time - Validity starting time of the certificate file.
- Validity Stop Time - Validity ending time of the certificate file.
- Client CA File Name - The name of the CA file.
- Client Certificate File Name - The name of the client certificate file.
- Client Certificate Key File Name - The name of the client key file.
- Issued By- The entity that issued the certificate.
- Issued To - The entity to which the certificate was issued.
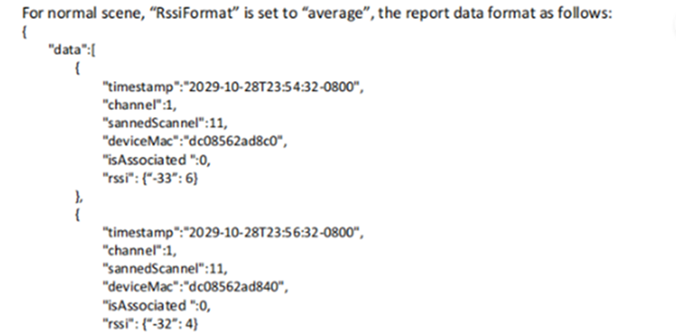
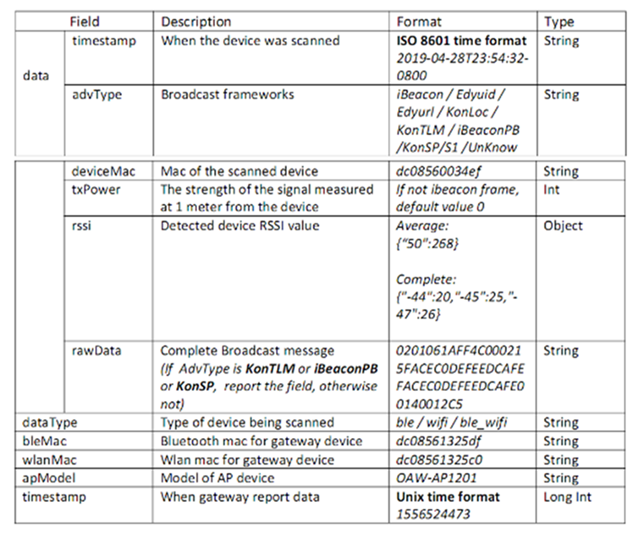
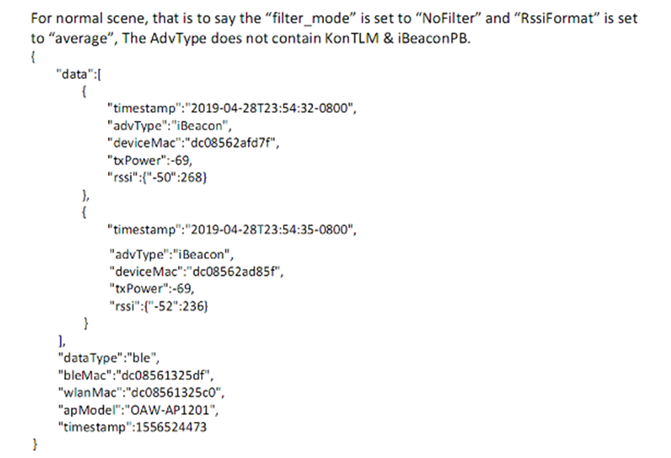
- The payload data format of the Bluetooth gateway report is an array of JSON, which contains one or more Bluetooth device information scanned in a reporting cycle.
- The reported information includes information about the scanned Bluetooth device and the Bluetooth gateway. Consider the following data format used to report the scanned information.
- To get smoothing BLE data, if the RssiFormat is “average” and the number of scans in a reporting cycle is greater than three, the highest and lowest values are removed and the average value is taken.
- To include the channel of the BLE channel of collected RSSI:
- BLE has only three fixed broadcast channels, and in a broadcast event, a broadcast packet is transmitted on each channel. As a result, it is not possible for the scanning device to specify that the scanning should take place on a specific channel.
- In a scanning event, the device will scan three channels in turn, and the scanned response data does not contain the channel.
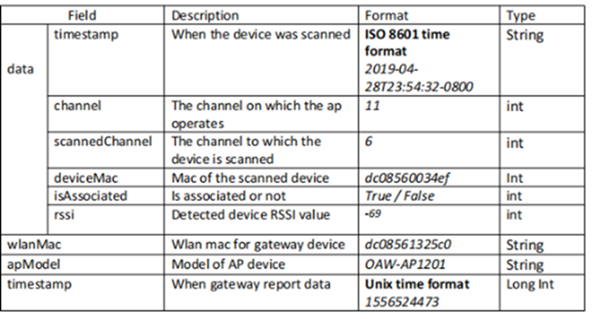
- If it is the scanning channel of the WiFi, that is supported.
- The payload data format of the gateway report is an array of JSON, which contains one or more WiFi device information scanned in a reporting cycle.
- The reported information includes information about the scanned WiFi device and the gateway. Consider the following data format used to report the scanned information.
2. Make Client Certificate and Client Key in two files separately. Client Certificate file should not include Client Key because when OmniVista converts certificate to CRT format, only the certificate part is converted, and the private key part is ignored.
3. CA Certificate file will be converted to CRT format and applied to AP, but content of the Certificate part is not changed.
To upload a Local RadSec Certificate, click on the Add icon and select Local Radsec to bring up the Create Local Radsec Certificate Screen. Complete the fields as described below, then click on the Create button.
Uploading a Stellar BLE Certificate
The Stellar BLE data reporting channel to any Asset Tracking application uses Kafka. However, the built-in common device certificate on the AP allows communication only with Stellar AP Asset Tracking solutions. You can upload a custom device certificate to the AP that will support sending BLE data to third-party Asset Tracking applications.
Note: Refer to Stellar BLE Data Format for information about the data format used to send BLE messages to third-party Asset Tracking applications.
To upload a BLE Certificate, click on the Add icon and select Stellar BLE to bring up the Create Stellar BLE Certificate Screen. Complete the fields as described below, then click on the Create button.
Uploading a Syslog Over TLS Certificate
The Syslog Over TLS Certificate is used when configuring remote logging of AP events over TLS.
Creating and Uploading the CA Certificate
To create a CA Certificate for Syslog Over TLS, complete the following steps:
1. Create an empty directory and navigate into that directory:
mkdir CA
cd CA
2. Create a few directories and give starting values to some support files:
mkdir certs crl newcerts private
echo "01" > serial
cp /dev/null index.txt
3. Copy openssl.conf to the current directory. Depending on your distributions, the source directory might be different, so check the list of files in the OpenSSL package before copying:
cp /etc/ssl/openssl.cnf openssl.cnf
4. Edit openssl.conf in the current directory:
vi openssl.cnf
5. Search for the following part and replace ./DemoCA with a single dot:
[ CA_default ]
dir = ./demoCA # Where everything is kept
certs = $dir/certs # Where the issued certs are keptChange to:
[ CA_default ]
dir = . # Where everything is kept
certs = $dir/certs # Where the issued certs are kept
6. As a last step, generate the certificate for the CA:
openssl req -nodes -new -x509 -keyout private/cakey.pem -out cacert.pem -days 365 -config openssl.cnf
The following will be displayed. Answer the questions as shown in the following example:
Generating a 2048 bit RSA private key
................................+++
...................+++
writing new private key to 'private/cakey.pem'
-----
You are about to be asked to enter information that will be incorporated into your certificate request.
What you are about to enter is called a Distinguished Name or a DN.
There are quite a few fields but you can leave some blank.
For some fields there will be a default value.
If you enter '.', the field will be left blank.
-----
Country Name (2 letter code) [AU]:CN
State or Province Name (full name) [Some-State]:BJ
Locality Name (eg, city) [ ]:BJ
Organization Name (eg, company) [Internet Widgits Pty Ltd]:HAN
Organizational Unit Name (eg, section) [ ]:.
Common Name (e.g. server FQDN or YOUR name) [ ]:chong
Email Address [ ]:chong@163.com
After the certificate is generated, you can view the cacert.pem certificate file:
.
├── cacert.pem
├── certs
├── crl
├── index.txt
├── newcerts
├── openssl.cnf
├── private
│ └── cakey.pem
└── serial
To upload the generated CA Certificate, click on the Add icon on the Certificate Screen and select Syslog Over TLS to bring up the Create Syslog Over TLS Certificate Screen. Complete the fields as described below, then click on the Create button.
Creating a Certificate for the Syslog Server
The next step is to create and sign a certificate for your syslog-ng OSE server. The common name should contain the FQDN or IP address of your server, and the e-mail address should be left blank.
openssl req -nodes -new -x509 -keyout serverkey.pem -out serverreq.pem -days 365 -config openssl.cnf
openssl x509 -x509toreq -in serverreq.pem -signkey serverkey.pem -out tmp.pem
openssl ca -config openssl.cnf -policy policy_anything -out servercert.pem - infiles tmp.pem
rm tmp.pem
The differences between the certificate and the generated CA certificate are as follows:
Common Name (e.g. server FQDN or YOUR name) [ ]:*
Email Address [ ]:
The generated servercert.pem and serverkey.pem files are required by the Syslog Server.
.
├── cacert.pem
├── certs
├── crl
├── index.txt
├── index.txt.attr
├── index.txt.old
├── newcerts
│ └── 01.pem
├── openssl.cnf
├── private
│ └── cakey.pem
├── serial
├── serial.old
├── servercert.pem
├── serverkey.pem
└── serverreq.pe
Uploading Stellar WIFI RTLS Certificate
The Stellar WiFi RTLS data reporting channel uses Kafka. However, the built-in common device certificate on the AP allows communication only with the OmniVista Cirrus 10 Stellar WiFi engine. You can upload a custom device certificate to the AP that will support sending WiFi RTLS data to third-party RTLS applications.
Note: Refer to Stellar WiFi RTLS Data Format for information about the data format used to send RTLS messages to third-party RTLS applications.
To upload a Stellar WiFi RTLS Certificate, click on the Add icon and select Stellar WIFI RTLS to bring up the Create Stellar WIFI RTLA Certificate Screen. Complete the fields as described below, then click on the Create button.
Certificate List
Web Server/External Portal Server File
Local LDAP File
802.1X Client File
Local RadSec
Stellar BLE
Syslog Over TLS
Stellar WiFi RTLS
Stellar BLE Data Format
Consider the following information and data format that is used to send BLE messages to third-party Asset Tracking applications:
Notes:
The reporting JSON data format is similar to the following:
Stellar WiFi RTLS Data Format
Consider the following information and data format that is used to send WiFi RTLS data to third-party RTLS applications:
The reporting JSON data format is similar to the following:
