SSIDs
The SSID application simplifies wireless network configuration with one-step provisioning, including SSID setup as well as authentication and policy configuration. When you create an SSID, relevant related default configurations (Access Role Profile, Access Policy, Authentication Strategy, Guest Access Strategy, BYOD Access Strategy, AAA Server Profile, Tunnel Profile, and Global Configuration) are automatically created and linked to the SSID using a name derived from the SSID. As you go through the creation/customization process you can customize these default SSID configurations to fit your network requirements.
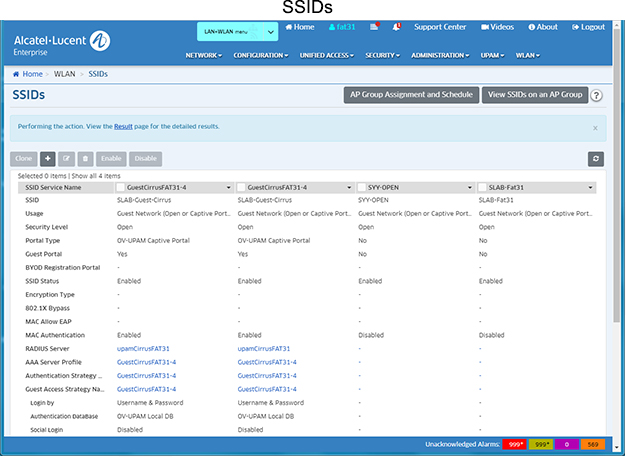
The SSIDs screen displays information about all configured SSIDs. The screen displays up to 15 SSIDs at a time. Scroll to view additional SSIDs. If you have more than 15 SSIDs, you can choose which 15 SSIDs to display on the screen by customizing the display order. The screen is used to Enable/Disable SSIDs, create, edit, and delete SSIDs, and modify an SSID's AP Group Assignment and AP Availability Schedule.
Note: SSIDs can also be configured in the WLAN Service (Expert) application. Note that WLAN Name and WLAN Service Name refer to the SSID Service Name.
Creating an SSID
Click on the Add icon to create and customize a new SSID. Complete the fields on the Create SSID Screen and the Customize SSID Screen to customize the SSID configuration.
Create an SSID
Complete the fields as described below to create an SSID, then click on the Create & Customize button to customize the configuration. After completing the configuration, click on the Save and Apply to AP Group button to apply the SSID to AP Groups.
- SSID Service Name - A unique name that identifies a specific wireless service. You can have multiple SSID Services using the same SSID. For example, you could define an SSID called "Student" and have two SSID Services at different locations - "School 1" and "School 2".
- SSID - A name that uniquely identifies the wireless network (up to 31 characters).
- Usage - The SSID’s usage. When you select a Usage, relevant related default configurations such as Access Policy, Authentication Strategy, Guest Access Strategy, and BYOD Access Strategy are automatically created and linked to the SSID using a name derived from the SSID. These configurations can then be customized for your network.
- Guest Network (Open or Captive Portal) - Create a network for Guest Users. Suitable for setting up an Open Network with or without a Captive Portal. This is typically used for Guests
- Employee BYOD Network - Create a network for employees connecting with their own devices. Suitable for setting up an Open Network for Employee BYOD devices. Access to the network is granted after BYOD portal authentication.
- Enterprise Network for Employees (802.1X) - Create a network for employees connecting with known devices. Suitable for setting up an Enterprise Network for Employees accessing the network with Company Property or BYOD devices.
- Protected Network (Pre-Shared Key & an Optional Captive Portal) - Create a Protected Network for Guest Users. Suitable for setting up a Personal network that requires a PSK/Passphrase, with or without a Captive Portal. This is typically used for Guests.
- Protected Network for Employees (Pre-Shared Key & BYOD Registration Portal) - Create Protected Network for employees connecting with their own devices. Suitable for setting up a Personal Network that requires a PSK/Passphrase for employee BYOD devices. Access to the network is granted after BYOD portal authentication.
- Captive Portal/BYOD - Depending on the Usage selected, you can enable/configure Captive Portal or BYOD authentication for the SSID.
- BYOD - Enable/Disable BYOD authentication for the SSID.
- Captive Portal - Enable/Disable Captive Portal Authentication for the SSID.
- OV-UPAM Captive Portal - Authenticate through OmniVista Cirrus UPAM Captive Portal.
- External Captive Portal - Authenticate through an external Captive Portal.
Note: You cannot edit an SSID that was configured with an Authentication Strategy that does not match the SSID Usage. For example, you cannot edit an SSID with Usage set to Captive Portal Guest Network and an Authentication Strategy with the Authentication Source set to Local database and Web Authentication set to None.
Customize an SSID
As mentioned earlier, when you create an SSID, relevant related default configurations (e.g., Access Role Profile, Access Policy, Authentication Strategy) are automatically created and linked to the SSID using a name derived from the SSID. As you go through the creation/customization process you can customize these SSID configurations to fit your network requirements.
When you create an SSID, the default configuration is displayed on the Customize SSID Screen. Complete the fields as described below to customize these defaults as well as additional SSID configurations. Note that the fields displayed depend on the Usage that you selected in the previous screen.
General
- SSID Service Name (Pre-Filled) - A unique name that identifies the wireless service.
- SSID - A name that uniquely identifies the wireless network (up to 31 characters).
- Usage - (Pre-Filled) The Usage selected for the network (e.g., Guest Network, Employee BYOD Network).
- Security Level (Pre-Filled) - The Security Level for the network based on the Usage selected (e.g., Open, Personal, Enterprise)
- Guest Portal/BYOD Registration (Pre-Filled) - Whether or not Captive Portal/BYOD Registration are configured (Yes/No).
- Portal Type - (Pre-Filled) - The type of Captive Portal/BYOD Portal configured (e.g., OV-UPAM Captive Portal).
- Allowed Band - The band(s) available on the network:
- 2.4 GHz
- 5.0 GHz
- 6.0 GHz
- All - 6.0 GHz, 5.0 GHz, and 2.4 GHz
Note: When 6 GHz is selected for the Allowed Band of a Protected Network or Protected Network for Employees, the only encryption method supported is WPA3_SAE_AES.
- Enhanced Open - Enables/Disables the use of Wi-Fi Enhanced Open™ to secure an open SSID. Wi-Fi Enhanced Open™ is a security standard that is based on Opportunistic Wireless Encryption (OWE). When enabled, OWE is used to ensure that communication between each pair of endpoints is protected from other endpoints. Data sent between a client and an AP is provided individualized data protection. Wi-Fi Enhanced Open™ offers improved data privacy, while maintaining convenience and ease-of-use. This functionality is particularly useful for provisioning a secure open SSID in public spaces. You can also enable an Enhanced Open Transition Mode for the SSID. When this mode is enabled, the AP broadcasts two different types of BSSID: one legacy Open SSID on 2.4GHz/5.0GHz band and one Enhanced Open SSID on 2.4GHz/5.0GHz/6.0GHz band. This allows both Enhanced Open and Non-Enhanced Open clients to connect to the same open SSID without adversely impacting the end user experience. The Enhanced Open setting is available when the SSID usage is set to Guest Network (Open or Captive Portal) or Employee BYOD Network. Select one of the following options to configure the Enhanced Open status for the SSID:
- Disabled - Disable Enhanced Open for the SSID. If 2.4GHz and/or 5.0GHz is the allowed band (not 6.0GHz), Enhanced Open is disabled by default. Note that you cannot disable Enhanced Open if the 6.0GHz band is selected.
- Enabled - Enable Enhanced Open for the SSID. If 6.0GHz is the allowed band, Enhanced Open is automatically enabled whether 2.4GHz or 5.0GHz is selected.
- Enabled - Transition Mode - Enable Enhanced Open Transition Mode for the SSID. Note that the Enhanced Open Transition Mode is supported only on APs running AWOS 4.0.8 or above. Enabling this mode for APs running older AWOS versions may cause the SSID to revert to an open SSID after a reboot. Upgrading your network is highly recommended.
- Encryption Type - The Encryption Type rule for the specified Access Role Profile. The specified Access Role Profile will be applied if the encryption type used by the client matches with the value defined in the rule. The types available depend on the Usage selected (e.g., Protected Network, Enterprise Network).
- Protected Network
- The WI-FI will be protected by a key.
- STATIC_WEP - Authentication with Static Wired Equivalent Privacy security algorithm.
- WPA_PSK_TKIP - WPA with TKIP encryption using a preshared key.
- WPA_PSK_AES - WPA with AES encryption using a preshared key.
- WPA_PSK_AES_TKIP - WPA with TKIP and AES mixed encryption using a preshared key.
- WPA2_PSK_TKIP - WPA2 with TKIP encryption using a preshared key.
- WPA2_PSK_AES - WPA2 with AES encryption using a preshared key.
- AUTO_WPA_WPA2- WPA or WPA2 mixed mode, which allows both WPA capable client and WPA2 capable client access.
- WPA3_SAE_AES - WPA3 with AES encryption using a preshared key, which ONLY allows WPA3 capable client access.
- WPA3_PSK_SAE_AES - WPA3 and WPA2 mixed mode, which allows both WPA3 capable client as well as ONLY WPA2 capable client access.
- Enterprise Network
- An authentication server will be used to authenticate the connecting client via 802.1x Authentication.
- DYNAMIC_WEP - WEP with dynamic keys.
- WPA_TKIP - WPA with TKIP encryption and dynamic keys using 802.1X.
- WPA_AES - WPA with AES encryption and dynamic keys using 802.1X.
- WPA2_TKIP - WPA2 with TKIP encryption and dynamic keys using 802.1X.
- WPA2_AES - WPA2 with AES encryption and dynamic keys using 802.1X.
- AUTO_WPA_WPA2- WPA or WPA2 mixed mode, which allows both WPA capable client and WPA2 capable client access.
- WPA3_AES256 - WPA3 with CNSA (Suite B) using 802.1X. Note that when WPA3_AES256 encryption is applied to an AP that does not support it, the encryption will automatically fall back to WPA2_AES. OAW-AP1101 full band, OAW-AP1201H 2.4G band, and OAW-AP1201L 2.4G band do not support WPA3_AES256 authentication.
- WPA3_AES - WPA3 with AES encryption and dynamic keys using 802.1X. Note that Stellar AP Models AP1101, AP1201H, and AP1201L do not support WPA3 authentication.
- Backward Compatibility - Enables/disables using WPA3_PSK_SAE_AES encryption on 2.4GHz and 5.0GHz bands when encryption is automatically set to WPA3_SAE_AES for the 6.0GHz band. When the 6.0GHz band is selected for the SSID, the other bands inherit using WPA3_SAE_AES encryption, which some legacy devices cannot use to connect to the SSID. By default, Backward Compatibility is disabled. When enabled, the WPA3_PSK_SAE_AES Encryption Type is automatically used for the 2.4GHz and 5.0GHz bands, and the 6.0GHz band continues to use WPA3_SAE_AES. The Backward Compatibility setting is available when the SSID usage is set to Protected Network (Pre-Shared Key & an Optional Captive Portal) or Protected Network for Employees (Pre-Shared Key & BYOD Registration Portal) and the Allowed Band is 6.0GHz. Note: If the MLO Band setting includes 6.0GHz, then the Backward Compatibility option is automatically disabled.
- 802.1X Bypass - 802.1X bypass administrative status (Enabled/Disabled). When 802.1X bypass is enabled, the user's 802.1X authentication method is performed conditionally based on the result of MAC Authentication. (Default = Disabled).
- MAC Authentication - MAC Authentication administrative status (Enabled/Disabled).
- MAC Allow EAP - Extensible Authentication Protocol (EAP) administrative status (Enabled/Disabled).
- Encryption Type - The encryption type used by the client (e.g., WPA/WPA2 AES).
- Key Format - PSK format.
- PSK/Passphrase - Enter a PSK Passphrase for authentication.
- Confirm PSK/Passphrase - Re-enter the PSK Passphrase.
- Device Specific PSK - Enables/Disables Device Specific PSK. Device Specific PSK provides more security than traditional PSK. If Device Specific PSK is enabled and a device is configured for Device Specific PSK, when the AAA Server sends the Radius Access Accept for MAC Authentication for the device, it will also send the specific pre-shared key for that device, differentiated by the device's MAC Address. This means that each device will have a different key. If enabled:
- Prefer Device Specific PSK - If the AAA Server sends the "AES-CBC-128" attribute along with the Radius Access Accept response, this value will be used. If the AAA server does NOT send the "AES-CBC-128" attribute, the key configured in the SSID will be used.
- Force Device Specific PSK - The value of "AES-CBC-128" attribute returned by AAA Server will be always used, whether it exists or not.
Note: Device Specific PSK will only work with a UPAM RADIUS Server and does not supported AUTO_WPA_WPA2 encryption. Devices are configured for Device Specific PSK on the Company Property Screen (UPAM - Authentication - Company Property). See the Company Property online help for more information. You can also configure a device for Device Specific PSK from the Authentication Record List (UPAM - Authentication - Authentication Record). See the Authentication Record online help for more information.
Private Group PSK
When a PSK-enabled SSID is created, you can either create a static PSK or enforce Device Specific PSK. This provides a common Passphrase key, which is suitable for networks requiring network-wide common PSK. Enabling the Private Group PSK (PPSK) allows you to create private groups of client devices based on a PPSK Entry. Each client device specifies a Passphrase when connecting to an SSID. If the passphrase matches any of the PPSK Entry, the client is placed in the specified Access Role Profile.
Configuring the Private Group PSK attribute is offered only when Device Specific PSK is Disabled or set to "Prefer Device Specific PSK". When the Device Specific PSK is set to "Force Device Specific PSK", OmniVista will not display the Private Group PSK attribute because the Passphrase specified in Company Property is used instead.
Complete the following fields to configure PPSK Entries:
- Private Group PSK - Enables/Disables the grouping of Device Specific PSKs. When enabled:
- PPSK Entries - At least one Private Group PSK (PPSK) Entry is required with the following parameters:
- Name - Enter a unique name to identify the PPSK Entry. No two Entries can have the same Name.
- Passphrase - Enter a unique PSK Passphrase for authentication. No two Entries can have the same Passphrase.
- Access Role Profile - Select the name of an Access Role Profile.
Note: Each SSID can have up to 16 PPSK Entries. The total number of entries across all SSIDs that exist on an AP cannot exceed 64 on any AP.
Authentication Strategy
- MAC Authentication - MAC Authentication administrative status on the network. If enabled:
- RADIUS Server - RADIUS Server used for authentication. Select an existing server from the drop-down or click on the Add icon to create a new server to select. Note the following when selecting the RADIUS Server:
- If you select a TLS-enabled RADIUS Server, the AAA profile generated for the SSID will specify only a Primary 802.1x Authentication Server and a Primary 802.1x Accounting Server, but other servers will be empty.
- If you select a TLS-disabled RADIUS Server, the AAA Server Profile generated for the SSID assigns the server for Captive Portal and MAC authentication. However, editing the TLS-disabled RADIUS Server for the SSID to enable TLS will fail. A TLS-enabled RADIUS Server does not support Captive Portal and MAC authentication in the AAA Server Profile.
- Stellar APs only support a single RadSec (RADIUS over TLS) server. If you set up multiple TLS-enabled Radius servers, make sure that all SSIDs within an AP Group are configured to use the same RadSec server.
- Guest Authentication Database - The database used for Guest Authentication.
The following configuration options may be available, depending on the Usage you selected:
- Advanced Configuration - Click on this link to go to the UPAM - Authentication Strategy Screen to customize your MAC Authentication configuration.
- Manage Employee Devices - Click on this link to open the UPAM Company Property window to view/manage devices owned by your company and assigned to an employee for daily use.
- Manage Guest Devices - Click on this link to open the UPAM Company Property window to view/manage known devices of Guests.
- Manage Employee Accounts - Click on this link to open the UPAM Local Employee Accounts window to view/manage Employee Accounts.
- Edit Server Attributes - Click on this link to open the RADIUS Server Management window to view/edit the selected RADIUS Server.
Note: The automatically generated AAA Server Profile is given the same name as the SSID. Do not make changes to this profile through the AAA Server Profile Page. For example, if you want to change the RADIUS server, edit the SSID and select a different RAIUS server. Alternatively, go to the AAA Server Profile page and select the corresponding profile row to make the edit.
Access Policy
- Default Access Policy - A default Access Policy is automatically created with the SSID Name. You can customize the default Access Policy by creating the SSID and then editing it. After creating the SSID, select the SSID on the SSIDs Screen and click on the Edit icon. The Default Access Policy will now display a "Customize" link. Click on the link to customize the Default Access Policy.
- Existing Access Policy - If you do not want to use the Default Access policy, you can select an existing policy from the drop-down menu. If necessary, you can create a new policy by going to the the UPAM - Authentication - Access Policy Screen. After creating the new policy, return to this screen to select the new policy.
Note: The "WLAN Name" Mapping Condition refers either to the "SSID Service Name" in the “SSIDs” application or to the "WLAN Service Name" in the WLAN Service (Expert) application.
Guest Access Strategy
- Portal Page - The name of the Captive Portal Page being used for guest access.
- Login By - The Captive Portal login method (e.g., Username and Password).
- Social Login - Administrative status of the Social Login feature (Enabled/Disabled). If enabled, a guest user can log into the network through a social media account (e.g., Facebook)
- Self-Registration Strategy - Administrative status of self-registration (Enabled/Disabled). If enabled, a guest user is required to perform self-registration and approval before accessing the network.
- URL to Redirect to on Success - the redirect URL for the browser that is presented after a guest user passes Captive Portal authentication.
The following configuration options may be available, depending on the Usage you selected:
- Customize - Click on this link to go to the UPAM Guest Access Strategy Screen and customize the Guest Access configuration.
- Customize Portal Page - Click on this link to go to the UPAM Custom Portal Screen and customize the Captive Portal Page presented to users.
- Manage Guest Accounts - Click on this link to open the UPAM Guest Accounts window, where you can view/manage Guest Accounts.
BYOD Access Strategy
- Portal Page - The name of the Captive Portal Page being used for BYOD access.
- Employee Database - The database used for employee records.
- URL to Redirect to on Success - The redirect URL for the successful BYOD authentication.
The following configuration options may be available, depending on the Usage you selected:
- Customize - Click on this link to go to the UPAM BYOD Access Strategy Screen and customize the BYOD Access configuration.
- Customize Portal Page - Click on this link to go to the UPAM Custom Portal Screen and customize the Captive Portal Page presented to users.
- Manage Employee Accounts - Click on this link to open the UPAM Local Employee Accounts window, to view/manage Employee Accounts.
Default VLAN/Network
A Default Access Role Profile will be applied to clients joining this SSID if a role cannot be assigned by other role assignment methods. In this section, you can configure the Default VLAN/Network and other attributes of this Default Access Role Profile. You can either create a new Access Role Profile or use an existing Access Role Profile for this SSID.
Configure Access Role Attributes
- General
- Default VLAN/Network
- VLAN(s) - Maps the profile to a specific VLAN(s) on network devices. For AOS Devices, a VLAN must exist on a switch to configure VLAN Mapping. However, for Stellar APs, you can map an Access Role Profile to untagged traffic (the VLAN ID must be between 1 and 4094 or "untagged"). Also note that for Stellar APs you can configure a VLAN Pool by entering multiple VLANs. You can enter VLANs as a range (e.g., 10-20), as individual VLANs (21, 23, 25), or both (10 - 20, 21, 23, 25). In addition, the number of WLANs the following Stellar AP models can support based on a configuration of 256 VLANs per WLAN/SSID varies:
- AP1301H - Maximum 2 WLANs/SSIDs can supported 256 VLANs; total 2x256 VLANs can be assigned to all WLAN on the device.
- AP1311/AP1301/AP1431/AP1411 - Maximum 4 WLANs/SSIDs can supported 256 VLANs; total 4x256 VLANs can be assigned to all WLAN on the device.
- AP1320/AP1331/AP1351/AP1451- Maximum 7 WLANs/SSIDs can supported 256 VLANs; total 7x256 VLANs can be assigned to all WLAN on the device.
- Use Tunnel (see Tunnel Guidelines below)
- Tunnel ID - The VPN ID used for Access Role Profile mapping. (Range = 0 - 16777215, suggested range of 64001 - 65000). If the Tunnel ID is set to "0", no GRE Key is sent.
- GRE Tunnel Server IP Address/Data VPN Server - The IP Address of the Tunnel Termination Switch (GRE Tunnel Server/Data VPN Server) used for mapping to the Access Role Profile. Select a switch from the drop-down or enter an IP address.
- Backup GRE Tunnel Server IP Address - The IP address of a backup GRE Tunnel Server to provide GRE tunnel redundancy between an AP and GRE Tunnel Server. Select a switch from the drop-down or enter an IP address. When the primary GRE Tunnel Server IP address goes down, the backup Tunnel Server takes over. Note that configuring a backup tunnel between an AP and the GRE Tunnel Server is supported on AWOS 4.0.5.15 or later.
- Keepalive Interval - The time interval, in seconds, for APs to check the status of the far-end IP address for the GRE Tunnel Server. (Range = 2 - 5 seconds, Default = 5 seconds)
- Response Timeout - The amount of time, in seconds, to wait for a response from the GRE Tunnel Server to keepalive requests. (Default = 2 seconds)
- Retries - The number of times to retry after a failed Keepalive request. (Range = 3 - 5, Default = 3). A failover to the backup GRE Tunnel Server IP address occurs after the last retry has failed.
- Preemption - Enables/Disables whether to go back to the primary GRE Tunnel Server. (Default = Disabled). When enabled:
- Preemption Countdown Timer - Specify the amount of time to wait, in seconds, after a failover to the backup GRE Tunnel Server before attempting to go back to the primary GRE Tunnel Server. The countdown timer restarts on every switchover to the backup server. (Default = 300 seconds)
- MTU - Specify the MTU value for the GRE Tunnel. The recommended value is 1476 for Raw GRE and 1416 for GRE over wireguard interface. Leave this value blank if you do not want to set a specific value.
- TCPMSS - Specify the TCPMSS value for the GRE Tunnel (Range = 500 - 1460, Default = 1250).
- Support of Entropy - Enables/Disables entropy. An ALE Switch acting as a GRE Tunnel Server requires Entropy; however, some third-party GRE Tunnel Servers (e.g., Linux) require no Entropy.
- Allow Local Breakout - Enables/Disables Local Breakout on the tunnel. If enabled, enter the Static Route(s) to be used for entering the Tunnel. All other traffic will go out through the local network. Make sure you have applied the relevant Data VPN Server to AP Groups in the SSID before choosing Data VPN Server as the Tunnel endpoint. To apply a Data VPN Server to an AP Group, go to the AP Groups page (Network - AP Registration - AP Group) and edit the Data VPN Setting for the group. Note that only one VLAN inside the tunnel (tunnel ID different from 0 if tagged, 0 if untagged) can be enabled with Local Breakout.
- Static Routes - Specify the static routes to be used for entering the tunnel. All other traffic will go out through the local network.
- Avoid specifying static routes pertaining to the VLAN ID of the traffic that enters the Tunnel. For example, if VLAN ID = 41 is specified to be carried within the Tunnel and if the network subnet that corresponds to VLAN 41 is 192.168.41.0, the AP will automatically set up this route and make sure traffic destined for 192.168.41.0 will enter the Tunnel. The AP will automatically set up this route and make sure traffic with VLAN ID = 41 will enter the Tunnel. Do not specify an explicit Route with Destination = 192.168.41.0, as that will confuse the AP and lead to poor performance.
- The static routes specified will be accumulated on an AP across all SSIDs assigned to the AP. For example, if you have two SSIDs configured on the same AP and configure SSID1 to use Tunnel Profile T1 with Static Routes A and B, and configure SSID2 to use Tunnel Profile T2 with Static Routes C and D, all of the routes (A, B, C, and D) will be applicable for SSID 1 and SSID 2.
- Across all of the routes applied on an AP from the different SSIDs, make sure any destination IP subnet is specified only once. Each route applied on an AP should be for a different IP subnet, even across the SSIDs. Also, avoid specifying static routes pertaining to the VLAN ID of the traffic that enters the tunnel. The AP will automatically set up such routes. If a route to IP subnet X already exists in an SSID and that SSID is applied to an AP, another route to the same IP subnet X must not be specified in the same or a different SSID that is applied to the same AP. .
- ACL/QoS - ACL/QoS Policy to be applied to traffic on the SSID. Click on the Add icon to configure a new policy.
- External Captive Portal
- Portal Server - The FQDN/IP address of the external captive portal server.
- Redirect URL - The redirect URL for the captive portal authentication.
- HTTPS Redirection - Specify whether the redirect portal page is using HTTPS protocol.
- AAA Server Profile - The AAA Server used for Captive Portal Authentication.
- Custom Profile - The External Captive Portal Config File used for communication between APs and the External Portal Server. The External Captive Portal Config File is configured on the AP Groups Screen in the AP Registration application.
- Web Content Filtering
- WCF Profile - Select a WCF Profile from the drop-down to include in the SSID. If necessary, click on Add New to bring up the WCF Profile Screen to add a new profile. An SSID can only contain one WCF Profile. Note that an AP will allow any URL to be accessed by the first time a user visits that URL, while the AP tries to determine whether this URL is to be restricted for this Access Role Profile or not. If the URL is to be restricted, subsequent users belonging to the same Access Role Profile will then be blocked from visiting this restricted URL. So, on any given AP, Web Content Filtering will not be effective for the first visitor of a restricted URL. Web Content Filtering rules will be effective for such first visitors only after DNS cache expires on the user device.
- Walled Garden
- Wireless Client Social Login Vendor - Select a vendor(s) to allow a wireless client to authenticate through a social media vendor (Facebook, Google, and Rainbow are supported). OmniVista will automatically configure the Allowlist Domains for the selected vendor(s). This will allow the user to connect over the Internet to the selected vendor(s) for authentication.
- Allowlist Domains - In addition to Facebook, Google, and Rainbow login, you can enter any Allowlist Domain to allow a user to connect to sites over the Internet without authentication. For example, a hotel may want to allow a guest to connect to their website without authentication. Enter the Allowlist Domain and click on the Add icon to allow access to the site. Repeat to add additional domains. Domains must be entered in Fully Qualified Domain Name (FQDN) format (e.g., www.marriot.com, www.bbc.com). IP Addresses and http/https prefixes should not be used.
Tunnel Guidelines
If you create two tunnel profiles with the same Remote IP and Tunnel ID, the "Support of Entropy" status must be the same on both tunnels (both must be "enabled" or "disabled"). Choose the value based on what use case you plan to deploy.
The following are the four possible use cases that are supported:
1. GRE Tunnel from AP to AOS Switch - This is the typical Guest Tunnel uses case where AOS acts as the Guest Tunnel Termination Switch. The AOS Switch expects the Tunnel ID to be non-0 and "Support of Entropy" must be "Enabled".
2. GRE Tunnel from AP to Non-AOS Switch/Server (e.g., Nokia 7750 SR/Standard Linux Tunnel Server) - This is the Guest Tunnel use case with a non-AOS switch. The Tunnel ID must be 0 and "Support of Entropy" must be "Disabled", as the Key field in L2GRE header is not expected by the Switch/Server.
3. GRE Tunnel Between AP and OV VPN Server Appliance - This is the regular Data VPN tunnel use case between Remote APs and and an OV VPN Server acting as the Data VPN Server. The Tunnel ID must be 0 and "Support of Entropy" must be "Disabled", as the Key field in L2GRE header is not expected by OV VPN Server.
4. GRE Tunnel from AP to AOS Switch, Over the Data VPN tunnel Between AP and OV VPN Server Appliance - This is a rare use case of using the Data VPN tunnel to reach from a remote site where the AP is located, to the Central Site where the AOS Switch is located. The AOS Switch expects the Tunnel ID to be non-0 and "Support of Entropy" must be "Enabled".
The following combinations of values are not supported:
- Tunnel ID > 0 and Support of Entropy = Disabled
- Tunnel ID = 0 and Support of Entropy = Enabled.
Choose an Existing Access Role Profile
- General
- Default VLAN/Network
- VLAN(s) - Maps the profile to a specific VLAN(s) on network devices. For AOS Devices, a VLAN must exist on a switch to configure VLAN Mapping. However, for Stellar APs, you can map an Access Role Profile to untagged traffic (the VLAN ID must be between 2 and 4090 or "untagged"). Also note that for Stellar APs you can configure a VLAN Pool by entering multiple VLANs. You can enter VLANs as a range (e.g., 10-20), as individual VLANs (21, 23, 25), or both (10 - 20, 21, 23, 25). In addition, the number of WLANs the following Stellar AP models can support based on a configuration of 256 VLANs per WLAN/SSID varies:
- AP1301H - Maximum 2 WLANs/SSIDs can supported 256 VLANs; total 2x256 VLANs can be assigned to all WLAN on the device.
- AP1311/AP1301/AP1431/AP1411 - Maximum 4 WLANs/SSIDs can supported 256 VLANs; total 4x256 VLANs can be assigned to all WLAN on the device.
- AP1320/AP1331/AP1351/AP1451- Maximum 7 WLANs/SSIDs can supported 256 VLANs; total 7x256 VLANs can be assigned to all WLAN on the device.
- Use Tunnel (see Tunnel Guidelines above.)
- Tunnel ID - The VPN ID used for Access Role Profile mapping. (Range = 0 - 16777215, suggested range of 64001 - 65000). If the Tunnel ID is set to "0", no GRE Key is sent.
- GRE Tunnel Server IP Address/Data VPN Server - The IP Address of the Tunnel Termination Switch (GRE Tunnel Server/Data VPN Server) used for mapping to the Access Role Profile. Select a switch from the drop-down or enter an IP address.
- Backup GRE Tunnel Server IP Address - The IP address of a backup GRE Tunnel Server to provide GRE tunnel redundancy between an AP and GRE Tunnel Server. Select a switch from the drop-down or enter an IP address. When the primary GRE Tunnel Server IP address goes down, the backup Tunnel Server takes over. Note that configuring a backup tunnel between an AP and the GRE Tunnel Server is supported on AWOS 4.0.5.15 or later.
- Keepalive Interval - The time interval, in seconds, for APs to check the status of the far-end IP address for the GRE Tunnel Server. (Range = 2 - 5 seconds, Default = 5 seconds)
- Response Timeout - The amount of time, in seconds, to wait for a response from the GRE Tunnel Server to keepalive requests. (Default = 2 seconds)
- Retries - The number of times to retry after a failed Keepalive request. (Range = 3 - 5, Default = 3). A failover to the backup GRE Tunnel Server IP address occurs after the last retry has failed.
- Preemption - Enables/Disables whether to go back to the primary GRE Tunnel Server. (Default = Disabled). When enabled:
- Preemption Countdown Timer - Specify the amount of time to wait, in seconds, after a failover to the backup GRE Tunnel Server before attempting to go back to the primary GRE Tunnel Server. The countdown timer restarts on every switchover to the backup server. (Default = 300 seconds)
- MTU - Specify the MTU value for the GRE Tunnel. The recommended value is 1476 for Raw GRE and 1416 for GRE over wireguard interface. Leave this value blank if you do not want to set a specific value.
- TCPMSS - Specify the TCPMSS value for the GRE Tunnel (Range = 500 - 1460, Default = 1250).
- Support of Entropy - Enables/Disables entropy. An ALE Switch acting as a GRE Tunnel Server requires Entropy; however, some third-party GRE Tunnel Servers (e.g., Linux) require no Entropy.
- Allow Local Breakout - Enables/Disables Local Breakout on the tunnel. If enabled, enter the Static Route(s) to be used for entering the Tunnel. All other traffic will go out through the local network. Make sure you have applied the relevant Data VPN Server to AP Groups in the SSID before choosing Data VPN Server as the Tunnel endpoint. To apply a Data VPN Server to an AP Group, go to the AP Groups page (Network - AP Registration - AP Group) and edit the Data VPN Setting for the group. Note that only one VLAN inside the tunnel (tunnel ID different from 0 if tagged, 0 if untagged) can be enabled with Local Breakout.
- Static Routes - Specify the static routes to be used for entering the tunnel. All other traffic will go out through the local network.
- Avoid specifying static routes pertaining to the VLAN ID of the traffic that enters the Tunnel. For example, if VLAN ID = 41 is specified to be carried within the Tunnel and if the network subnet that corresponds to VLAN 41 is 192.168.41.0, the AP will automatically set up this route and make sure traffic destined for 192.168.41.0 will enter the Tunnel. The AP will automatically set up this route and make sure traffic with VLAN ID = 41 will enter the Tunnel. Do not specify an explicit Route with Destination = 192.168.41.0, as that will confuse the AP and lead to poor performance.
- The static routes specified will be accumulated on an AP across all SSIDs assigned to the AP. For example, if you have two SSIDs configured on the same AP and configure SSID1 to use Tunnel Profile T1 with Static Routes A and B, and configure SSID2 to use Tunnel Profile T2 with Static Routes C and D, all of the routes (A, B, C, and D) will be applicable for SSID 1 and SSID 2.
- Across all of the routes applied on an AP from the different SSIDs, make sure any destination IP subnet is specified only once. Each route applied on an AP should be for a different IP subnet, even across the SSIDs. Also, avoid specifying static routes pertaining to the VLAN ID of the traffic that enters the tunnel. The AP will automatically set up such routes. If a route to IP subnet X already exists in an SSID and that SSID is applied to an AP, another route to the same IP subnet X must not be specified in the same or a different SSID that is applied to the same AP.
- Default Access Role Profile - Select the default Access Role Profile that will be applied to clients if a role cannot be assigned by other role assignment methods.
Advanced Access Role Configuration
- Location Policy - Select a Location Policy. A Location Policy defines a specific location where a device can access the network. The policy is associated with an Access Role Profile and applied to devices classified into the Access Role Profile.
- Period Policy - Select a Period Policy. A Period Policy specifies the days and times during which a device can access the network. The policy is associated with an Access Role Profile and applied to devices classified into the Access Role Profile.
- Bandwidth Control Settings
- Upstream Bandwidth - The maximum bandwidth limit allocated for ingress traffic on UNP ports assigned to the profile. If the maximum ingress bandwidth value is set to zero, all ingress traffic is allowed on the UNP port. (Not supported on AOS 7.3.4 switches and ignored when applied to those devices.)
- Downstream Bandwidth - The maximum bandwidth limit allocated for egress traffic on UNP ports assigned to the profile. If the maximum egress bandwidth
set to zero, all egress traffic is allowed on the UNP port. (Not supported on AOS 7.3.4 switches and ignored when applied to those devices.)
- Upstream Burst - The maximum ingress depth value that is applied to traffic on UNP ports that are assigned to the profile. This value determines how much the traffic can burst over the maximum ingress bandwidth rate. The maximum ingress depth value is configured in conjunction with the maximum ingress bandwidth parameter. When the ingress depth value is reached, the switch starts to drop packets. (Not supported on AOS 7.3.4 switches and ignored when applied to those devices.)
- Downstream Burst - The maximum egress depth value that is applied to traffic on UNP ports that are assigned to profile. This value determines how much the traffic can burst over the maximum egress bandwidth rate. The maximum egress depth value is configured in conjunction with the maximum egress bandwidth parameter. When the egress depth value is reached, the switch starts to drop packets. (Not supported on AOS 7.3.4 switches and ignored when applied to those devices.)
- Client Session Logging - Enables/Disables client session logging.
- Client Connection Logging Level - Select a logging level:
- Logging HTTP/HTTPs - Log only the HTTP/HTTPs web session of wireless clients.
- Logging ALL - Log all sessions of wireless clients, including HTTP/HTTPs.
- None - Log only client online/offline behavior, without session details.
- DHCP Option 82 - Enables/Disabled the DHCP Option 82 Feature. If necessary, click on the link to go to the DHCP Option 82 Screen to configure the feature.
Advanced WLAN Service Configuration
SSID Setting
- Basic
- Hide SSID - Enables/Disables SSID in beacon frames. Note that hiding the SSID does very little to increase security. (Default = Disabled)
- UAPSD - Enables/Disables Unscheduled Automatic Power Save Delivery (UAPSD) on the SSID. UAPSD is a QoS facility defined in IEEE 802.11e that extends the battery life of mobile clients. In addition to extending battery life, this feature reduces the latency of traffic flow that is delivered over the wireless media. Because UAPSD does not require the client to poll each individual packet that is buffered at the access point, it allows delivery of multiple downlink packets by sending a single uplink trigger packet. (Default = Enabled)
- Security
- Classification Status - Enables/Disables classification. If classification is enabled, traffic will be classified to a role based on the configured classification rules. Note that the precedence of role assignment methods is important. Classification Rules are only used if 802.1x/MAC authentication does not return a role, or the returned role is not matched with any configured roles in the device.
- MAC Pass Alt - If MAC Authentication is enabled, select an Access Role Profile to assign to clients that pass MAC Authentication.
- Client Isolation - Enables/Disables Client Isolation. If enabled, clients connecting to the SSID are isolated from the network; client traffic can only go toward the router/default gateway. (Default = Disabled)
- Protected Management Frame - Configures whether connections are accepted from clients supporting Protected Management Frame for certain Security Levels/Encryption Types (Enterprise - WPA2_AES/WPA3_AES256/ WPA3AES, Personal - WPA2_PSK_AES/WPA3_SAE_AES/WPA3_PSK_SAE_AES)
- Disabled - Disables Protected Management Frame requirements.
- Optional - Allows connections from clients supporting Protected Management Frame and clients that do not.
- Required - Only allows connections from clients supporting Protected Management Frame.
- MultiLink Operation (MLO) - MLO allows for the simultaneous sending and receiving of data between different frequency bands and channels.
Note: The MLO function also relies on the radio status and the radio Extremely High Throughput (EHT) setting. Make sure the corresponding radio and the radio EHT are enabled to activate MLO.
- MLO - Enables/Disables MLO. (Default = Disabled)
- MLO Band - When MLO is enabled, the bands selected are taken from the Allowed Band setting. For example, if Allowed Band is set to 2.4GHz and 5GHz, then the MLO band is set to 2.4GHz and 5GHz by default when MLO is enabled. When the Allowed Band is set to 2.4GHz, 5GHz, and 6GHz, you can change the MLO bands as needed. Note that when you change the MLO bands, it does not change the Allowed Bands. In addition, if the MLO Band setting includes 6GHz, then the Backward Compatibility option for Encryption is automatically disabled.
- Hotspot 2.0
- Hotspot 2.0 - Enables/Disables Hotspot 2.0. Hotspot 2.0 is a new standard for public-access Wi-Fi that enables seamless roaming among Wi-Fi networks and between Wi-Fi and cellular networks. Hotspot 2.0 was developed by the Wi-Fi Alliance and the Wireless Broadband Association to enable seamless hand-off of traffic without requiring additional user sign-on and authentication. Note that Hotspot 2.0 is only supported with Enterprise WPA2_AES or Enterprise WPA3_AES256 Encryption. You must first select one of these Encryption types before you can enable Hotspot 2.0.
- Operator Name - The operator providing the Hotspot service (0 - 252 characters).
- Venue Name - The venue where the Hotspot is hosted (0 - 252 characters).
- Venue Type - The type of venue hosting the Hotspot.
- Network Detail - The type of Hotspot network.
- Domain List - The list of Hotspot Domains. You can have up to 16 Domain Names (1 - 255 characters each).
- Roaming OIs - The Roaming Organization Identifier. You can have up to 16 OIs. Each OI field is 3 characters in length if the organizationally unique identifier is an OUI, or 5 octets in length if the organizationally unique identifier is an OUI-36.
- NAI Realms - The Network Access Identifier (NAI) realm that provides client access through the AP to the operator providing the Hotspot service. Creating an NAI Realm profile is required to use the Ameriband (American Bandwidth) Hotspot service provider. You can select a profile from the drop-down list or click on the Add icon to create a new profile by completing the fields below. You can create up to eight NAI Realm hotspot profiles per SSID.
- Name - Enter the Name to identify the NAI Realm profile. The domain name of the service provider is often used for this field value.
- Encoding - Select "utf8"or "rfc4282" to specify the encoding of the NAI Realm name.
- Method Group - Configure the EAP authentication method for the NAI Realm. You can create up to four Method Groups per NAI Realm profile.
- EAP Methods - Select one of the following options to identify the EAP method supported by the Hotspot realm:
- IDENTITY-1: Use EAP Identity type.
- NOTIFICATION-2: Allow the hotspot realm to use EAP Notification messages for authentication.
- ONE-TIME-PASSWORD-5: Use Authentication with a single-use password.
- GENERIC-TOKEN-CARD-6: Use EAP-GTC.
- EAP-TLS-13: Use EAP-TLS.
- EAP-SIM-18: Use EAP for GSM SIM.
- EAP-TTLS-21: Use EAP-TTLS.
- EAP-AKA-23: To use EAP for UMTS Authentication and Key Agreement.
- PEAP-25: Use PEAP.
- CRYPTO-CARD-28: Use crypto card authentication.
- PEAPMSCHAPV2-29: Use PEAP with MSCHAPv2.
- EAP-AKA-50: "EAP-AKA" to use EAP for UMTS Authentication and Key Agreement.
- Auth Param ID/Auth Value - Select one of the following authentication methods and coresponding authentication value to send to the NAI Realm:
| Auth Param ID |
Auth Value |
| Reserved-0 |
-- |
| Non-EAP-Inner-Auth-2 |
Reserved-0
PAP-1
CHAP-2
MSCHAP-3
MSCHAPv2-4 |
| EAP-Inner-Auth-3 |
Reserved-0
PAP-1
CHAP-2
MSCHAP-3
MSCHAPv2-4 |
| Credential-5 |
SIM-1
USIM-2
NFC-Secure-3
HW-Token-4
Softoken-5
Certificate-6
Username-Passward-7
None-8
Reserved-9 |
- MCC/MNCs - The 3GPP Mobile Country Codes/Mobile Network Codes combination to assist with selecting an AP to access 3GPP cellular networks. Click here to locate the MCC/MNC values for a specific Hotspot service provider. You can add up to 16 MCC/MNC values. Click on the Add icon to enter the MCC/MNC values with a comma separating each code. For example, if MCC = 310 and MNC = 260, you would enter "310,260".
- Advanced
- Roaming Controls
- L3 Roaming - Enables/Disables Layer 3 roaming. Layer 3 roaming allows client to move between Access Points and connect to a new IP subnet and VLAN.
- FBD Update on Association - Enables/Disables FDB update on Association. If enabled, when a client roams to a new AP, the AP will send ARP packets to the uplink switch to notify the switch to change the downstream forwarding port for the wireless client's traffic.
- 802.11r - Enables/Disables IEEE 802.11r (Fast BSS Transition). The Fast BSS Transition mechanism minimizes the delay when a a client transitions from one BSS to another within the same group.
- OKC - Enables/Disables OKC Roaming. If OKC Roaming is enabled, a cached Pairwise Primary Key is used when the client roams to a new AP. This allows faster roaming of clients without the need for a complete 802.1x authentication.
- 802.11k Status - Enables/Disables 802.11k. The 802.11k protocol enables APs and clients to dynamically measure the available radio resources. When 802.11k is enabled, APs and clients send neighbor reports, beacon reports, and link measurement reports to each other.
- 802.11v Status - Enables/Disables 802.11v. 802.11v standard defines mechanisms for wireless network management enhancements and BSS transition management. It allows client devices to exchange information about the network topology and RF environment. The BSS transition management mechanism enables an Instant AP to request a voice client to transition to a specific AP, or suggest a set of preferred APs to a client due to network load balancing or BSS termination. It also helps the client identify the best AP to transition to as they roam.
- Client Controls
- Max Number of Clients Per Band - The maximum number of clients allowed in each band. (Range = 1 - 256, Default = 64)
- 802.11b Support - Enables/Disables allowing 11b legacy clients connect to APs.
- 802.11a/g Support - Enables/Disables allowing 11a/g legacy clients connect to APs.
- Minimum Client Date Rate Controls
- 2.4GHz Minimum Client Data Rate Controller - Enables/Disables 2.4G band access control based on client data rate.
- 2.4GHz Minimum Client Data Rate - 2.4G band client with lower data speed will not be given access.
- 5GHz Minimum Client Data Rate Controller - Enables/Disables 5G band access control based on client data rate.
- 5GHz Minimum Client Data Rate - 5G band client with lower data speed will not be given access.
- 6GHz Minimum Client Data Rate Controller - Enables/Disables 6G band access control based on client data rate.
- 6GHz Minimum Client Data Rate - 6G band client with lower data speed will not be given access.
- Notes:
- Disabling lower bands has an impact on the coverage area.
- Depending on the environment, we recommend 12 Mbps or 24 Mbps setting for minimum client data rates.
- Higher Mbps value means less coverage; lower value means larger coverage.
- Minimum MGMT Rate Controls
- 2.4GHz Minimum MGMT Rate Controller - Enables/Disables 2.4G band wireless management frame rate control.
- 2.4GHz Minimum MGMT Rate - 2.4G band wireless management frame transmit rate.
- 5GHz Minimum MGMT Rate Controller - Enables/Disables 5G band wireless management frame rate control.
- 5GHz Minimum MGMT Rate - 5G band wireless management frame transmit rate.
- 6GHz Minimum MGMT Rate Controller - Enables/Disables 6G band wireless management frame rate control.
- 6GHz Minimum MGMT Rate - 6G band wireless management frame transmit rate.
- Notes:
- Disabling lower bands has an impact on the coverage area.
- Depending on the environment, we recommend 12 Mbps or 24 Mbps setting for minimum management rates.
- Higher Mbps value means less coverage; lower value means larger coverage.
- High-Throughput Control
- A-MSDU - Enables/Disables Aggregate MAC Service Data Unit. A-MSDU is a structure containing multiple MSDUs, transported within a single (unfragmented) data MAC MPDU.
- A-MPDU - Enables/Disables Aggregate MAC Protocol Data Unit. A-MPDU is a method of frame aggregation, where several MPDUs are combined into a single frame for transmission.
- Power Save Controls
- DTIM Interval - The Delivery Traffic Indication Message (DTIM) period in beacons. The DTIM interval determines how often the AP should deliver the buffered broadcast and multicast frames to associated clients in the "power save" mode. The default value is 1, which means the client checks for buffered data on the OAW-IAP at every beacon. You can configure a higher DTIM value for power saving (Range = 1 - 255).
- 802.11 Frame Controls
- Advertise AP Name - Enables/Disables the advertising of the AP name in the standard 802.11 beacon frame with a vendor-specific tag. When enabled, the AP name is displayed instead of the AP MAC address.
QoS Settings
- Bandwidth Contract
- Upstream Bandwidth - The maximum bandwidth for traffic from the switch to the client
- Downstream Bandwidth - The maximum bandwidth for traffic from the client to the switch.
- Upstream Burst - The maximum bucket size used for traffic from the switch to the client. The bucket size determines how much the traffic can burst over the maximum bandwidth rate
- Downstream Burst -The maximum bucket size used for traffic from the client to the switch. The bucket size determines how much the traffic can burst over the maximum bandwidth rate.
- Broadcast/Multicast Optimization
- Broadcast Key Rotation - Enables/Disables the broadcast key rotation function. If enabled, the broadcast key will be rotated after every interval time.
- Broadcast Key Rotation Time Interval - The interval, in minutes, to rotate the broadcast key (Range = 1 - 1440, Default = 15).
- Broadcast Filter All - Enables/Disables broadcast filtering. If enabled, all broadcast frames are dropped, except DHCP and Address Resolution Protocol (ARP) frames.
- Broadcast Filter ARP - Enables/Disables broadcast filtering for ARP. If enabled, the AP will act as an "ARP Proxy". If the ARP-request packet requests a client's MAC address and the AP knows the client's MAC and IP address, the AP will respond to the ARP-request but not forward the ARP-request (broadcast) to all broadcast domains. This reduces ARP broadcast packet forwarding and significantly improves network performance. Note that APs do not act as ARP proxy for Gratuitous ARP packets. When the station gets an IP from DHCP or IP release/ renew, the station will send Gratuitous ARP packets. AP will not respond to such special ARP packets and broadcast them normally.
- Multicast Optimization - Enable/Disables multicast traffic rate optimization.
- Multicast Based Channel Utilization - Configures based channel utilization optimization percentage. (Range = 0 - 100, Default = 90)
- Number of Clients - Configure the threshold for multicast optimization. This is the maximum number of high-throughput.
- 802.1p Mapping
- Used to configure the uplink and downlink mapping mechanism between Wi-Fi Multimedia (WMM) Access Categories and 802.1p priority. Uplink traffic can only be mapped to a single value. Downlink traffic can be mapped to multiple values. Fields are populated with the default values. To modify a default uplink value, enter a new value in the field. To modify a default downlink value, enter a new value and click on the Add icon. To remove a value, click on the "x" next to the value.
- Background - WMM Background will be mapped to the 802.1p value.
- Uplink - Maps uplink traffic (from AP to network). (Range = 0 - 7, Default = 1)
- Downlink - Maps downlink traffic (from network to AP). (Range = (Range = 0 - 7, Default = 1, 2)
- Best Effort - WMM Best Effort will be mapped to the 802.1p value.
- Uplink - Maps uplink traffic (from AP to network). (Range = 0 - 7, Default = 0)
- Downlink - Maps downlink traffic (from network to AP). (Range = (Range = 0 - 7, Default = 0, 3)
- Video - WMM Video will be mapped to the 802.1p value.
- Uplink - Maps uplink traffic (from AP to network). (Range = 0 - 7, Default = 4)
- Downlink - Maps downlink traffic (from network to AP). (Range = (Range = 0 - 7, Default = 4, 5)
- Voice - WMM Voice will be mapped to the 802.1p value.
- Uplink - Maps uplink traffic (from AP to network). (Range = 0 - 7, Default = 6)
- Downlink - Maps downlink traffic (from network to AP). (Range = (Range = 0 - 7, Default = 6, 7)
- DSCP Mapping
- Used to configure the uplink and downlink mapping mechanism between Wi-Fi Multimedia (WMM) Access Categories and DSCP priority. Uplink traffic can only be mapped to a single value. Downlink traffic can be mapped to multiple values. Fields are populated with the default values. To modify a default uplink value, enter a new value in the field. To modify a default downlink value, enter a new value and click on the Add icon. To remove a value, click on the "x" next to the value.
- Trust Original DSCP - If enabled, the original DSCP mapping for uplink traffic is trusted (Default = Disabled).
- Background - WMM Background will be mapped to the 802.1p value.
- Uplink - Maps uplink traffic (from AP to network). (Range = 0 - 7, Default = 10)
- Downlink - Maps downlink traffic (from network to AP). (Range = (Range = 0 - 7, Default = 2, 10)
- Best Effort - WMM Best Effort will be mapped to the 802.1p value.
- Uplink - Maps uplink traffic (from AP to network). (Range = 0 - 7, Default = 0)
- Downlink - Maps downlink traffic (from network to AP). (Range = (Range = 0 - 7, Default = 0, 18)
- Video - WMM Video will be mapped to the 802.1p value.
- Uplink - Maps uplink traffic (from AP to network). (Range = 0 - 7, Default = 40)
- Downlink - Maps downlink traffic (from network to AP). (Range = (Range = 0 - 7, Default = 24, 36, 40)
- Voice - WMM Voice will be mapped to the 802.1p value.
- Uplink - Maps uplink traffic (from AP to network). (Range = 0 - 7, Default = 46)
- Downlink - Maps downlink traffic (from network to AP). (Range = (Range = 0 - 7, Default = 46, 48, 56)
Editing an SSID
Select an SSID by clicking on the checkbox in the upper-left corner of the SSID column, then click on the Edit icon. The Customize SSID Screen appears. Edit the configuration as described above and click on the Save and Apply to AP Group button. The new configuration will be saved and applied to the AP Groups on which the SSID was previously applied.
If you edit an SSID that was created in a previous release of OmniVista Cirrus, there is an extra step in the edit process. When you click on the Edit icon, the Upgrade SSID Screen appears. Depending on the type of Security Level configured for the WLAN Service (Personal/Open), only certain Usages will be available for editing. Select a Usage and Captive Portal/BYOD configuration and click on the Upgrade & Customize button. The Customize SSID Screen appears. Edit the configuration as described above and click on the Save and Apply to AP Group button to apply the edited SSID to AP Groups.
Note: You can only edit one SSID at a time. You cannot edit the SSID Name.
Deleting an SSID
Select an SSID(s) by clicking on the checkbox in the upper-left corner of the SSID column, click on the Delete icon, then click OK at the Confirmation Prompt. Note that when you delete an SSID you delete the relevant related configurations created for the SSID (e.g., Access Role Profile, Access Policy, Authentication Strategy), unless those configurations are in use outside of this SSID.
Applying an SSID
The AP Group Assignment and Schedule Screen is used to apply SSIDs to AP Groups. You can also set an availability schedule for APs in a group. Select AP Groups as described below, set a schedule, and click on the Apply button.
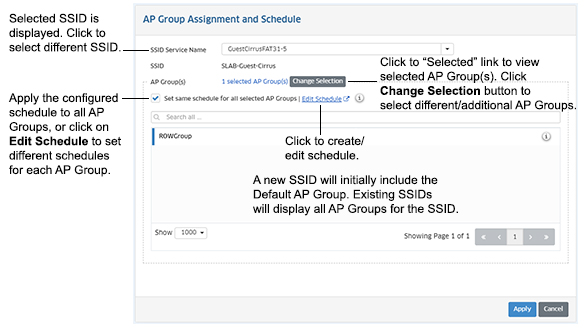
Note: If you have just created an SSID, the SSID Name is displayed in the SSIDs field (as shown above). If you clicked on the AP Group Assignment and Schedule button to modify an existing SSID's AP Group assignment or AP Schedule, select an SSID from the SSID's drop-down menu.
Note: The maximum number of SSIDs per band that an AP can support is based on the AP model and whether the Extended SSID Scale option is enabled for the AP Group to which the AP belongs.
- Extended SSID Scale option is disabled (the default) - AP allows a maximum of 7 SSIDs per band. This means up to 7 SSIDs with Allowed Band = 2.4GHz, up to 7 SSIDs with Allowed Band = 5GHz, and up to 7 SSIDs with Allowed Band = 6GHz. Alternatively, you can have up to 7 SSIDs with Allowed Band = All. If you apply an SSID to an AP Group and it causes a breach of this maximum limit, the "Apply" operation will fail on that AP Group.
- Extended SSID Scale option is enabled - AP models that support more than 7 SSIDs per band will allow a maximum of 14 SSIDs per band. This means up to 14 SSIDs with Allowed Band = 2.4GHz, up to 14 SSIDs with Allowed Band = 5GHz, and up to 14 SSIDs with Allowed Band = 6GHz. Alternatively, you can have up to 14 SSIDs with Allowed Band = All. If you apply an SSID to an AP Group and it causes a breach of this maximum limit, the "Apply" operation will fail on that AP Group.
- 6GHZ networks - The Extended SSID Scale status does not apply to 6GHz networks, which have a limit of 4 SSIDs per AP Group.
Applying an SSID to AP Groups
If you are creating a new SSID, the Default AP Group is pre-selected by default and is displayed in the AP Group area. Click on the Change Selection button to add/remove AP Groups.
Note: You do not have to apply the SSID to an AP Group when you create it. Click on the Cancel button to create the SSID without any AP Group assignment. You can apply AP Groups to the SSID at any time by selecting the SSID in the SSIDs Table and clicking on the AP Group Assignment and Schedule button.
If you are editing an SSID, all of the AP Groups to which the SSID was applied are displayed as pre-selected. Click on the Change Selection button to bring up the AP Group Selection window to add/remove AP Groups.
Scheduling AP Availability
By default, the schedule you set is applied to all selected AP Groups, however set different schedules for each selected AP Group, as described below:
- Set the Same Schedule For All Selected Groups - By default, the Set same schedule for all selected AP Groups checkbox is enabled. If selected, the schedule you configure is applied to all selected AP Groups. Click on the Edit Schedule button to bring up the Timer Dialog window and set the schedule. By default, the "Always Available" radio button is selected. Select the "Specific Timer" radio button to set a specific schedule for all selected AP Groups. You can set the start and stop (From/To) availability hours for all days of the week or for specific days of the week. Set the schedule and click OK.
- Set a Different Schedule for Selected AP Groups - To set a different schedule for selected AP Groups, uncheck the Set same schedule for all selected AP Groups checkbox. Click on the Edit Schedule link next to an AP Group in List of Selected AP Groups to bring up the Timer Dialog window and set the schedule for the group. By default, the "Always Available" rad button is selected. Select the "Specific Timer" radio button to set a specific schedule for all selected AP Groups. You can set the start and stop (From/To) availability hours for all days of the week or for specific days of the week. Set the schedule and click OK. Repeat the process for each AP Group.
Editing an SSID AP Group/Schedule
To edit an SSID's AP Group assignment or AP Schedule, select the SSID and click on the AP Group Assignment and Schedule button at the top of the SSIDs Screen. The AP Group Assignment and Schedule Screen appears with the selected SSID displayed in the SSIDs field. Edit the AP Groups and/or AP Schedule as described above and click on the Apply button.
Note that you can also just click on the AP Group Assignment and Schedule button and select the SSID you want to modify from the SSIDs drop-down menu.
Enabling/Disabling an SSID
Click on the checkbox next to an SSID(s) and select the Enable or Disable button to enable/disable an SSID. When you disable an SSID, the SSID stops broadcasting; the configuration remains on the AP. When you enable an SSID, it begins broadcasting again.
SSIDs Table
The SSIDs Screen displays information about all configured SSIDs. If a specific parameter has not been configured for an SSID, the field is blank. The screen displays up to 15 SSIDs at time. Scroll to view configured SSIDs. You can also customize the display order of the SSIDs on the screen. The screen can also be used to quickly edit relevant related SSID configurations (e.g., Access Role Profile, Access Policy, Authentication Strategy).
Customizing the Display
You can customize the order in which SSIDs are displayed on the screen, prioritizing them so that specific SSIDs are shown in the first columns. Click on the drop-down arrow at the top of a column to display a list of all configured SSIDs and select an SSID. The selected SSID will be displayed in that column.
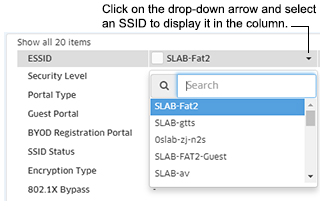
The SSID that was previously displayed will not be "moved" to another location. To re-display that SSID, go to another column and repeat the procedure to re-display that SSID in that column.
If you have fewer than 15 SSIDs configured and create a new SSID, the new SSID will be displayed in the last column. However, if you have reached the maximum display of 15 SSIDs and create a new SSID, the SSID will not replace an existing SSID in the display. To display the SSID you must click on the drop-down at the top of one of the columns and select the new SSID.
Editing an SSID's Related Configurations
You can quickly edit relevant related SSID configurations (e.g., Access Role Profile, Access Policy, Authentication Strategy) from the SSIDs Screen. The names of these configurations are displayed as a hyperlink. Click on the link to open a configuration window. The configuration will be pre-selected with the Detailed Configuration information displayed. Click on the Edit icon on the window to edit the configuration. Click on the Apply button to apply the update, then click on the Close button to close the window and return to the SSIDs Screen.
Note: If you edit the Access Role Profile for an SSID, you must re-apply the profile to the SSID. After editing the Access Role Profile, select the SSID on the SSIDs Screen, and click on the AP Group Assignment and Schedule button. The AP Group Assignment and Schedule Screen appears. Click on the Apply button to apply the new configuration.
Note: When an SSID is created with a RADIUS Server, the auto-generated AAA Server Profile for the SSID assigns the RADIUS Server for Captive Portal and MAC authentication. If TLS was disabled for the RADIUS Server configured for the SSID, enabling TLS for the server will fail because a TLS-enabled RADIUS Server does not support Captive Portal and MAC authentication in the AAA Server Profile.