The Provisioning Rules Screen displays information about currently-configured Provisioning Rules, and is used to create, edit, and delete Provisioning Rules. You can create Rules for specific switches (by serial number or MAC Address) or by switch model (e.g., OS6350-P10). If a switch matches a Rule (e.g., matching serial number, matching switch model), the Management and Configuration Templates in the Rule are pushed to the switch. When the configuration process is complete on the switch, the switch is displayed in the Managed Devices List and can be managed by OmniVista. The screen is also used to configure the view/configure the Default Management Users Template, and the Configuration and Management Templates.
Important Note: There are switch configuration steps that must be completed to enable provisioning on a switch. See the Provisioning Overview Online Help for an overview of the application, including switch setup, configuration workflow, and troubleshooting.
Click on the Add icon at the top of the Rules List. Complete the fields as described below. Click on the Finish icon (checkmark) at the top of the Rules List when you are finished, then click OK at the Confirmation Prompt.
Note: You can create a Rule for a specific switch (Serial Number/MAC Address) or a switch model (e.g., OS6860-P48). A Rule can have Serial Number/MAC or Model Name but not both. Also note that if there is one Rule with a Serial Number and another Rule with MAC Address both pertaining to the same device, the Serial Number Rule will be used.
Note: Switch Model Rules can save time since they allow you to apply a configuration to a large number of switches at once. However, you may want to create a Switch Model Rule for a large number of switches, but want to have a different Rule for some of those switches. In this case, after creating the Switch Model Rule, create a Serial Number Rule for those "different" switches. The Serial Number Rule will take precedence over the Switch Model Rule for those switches.
To create a Configuration Template for a Rule, go to the "Switch Config Template" column in the Rules Table, click on the drop-down arrow and select Add New to bring up the Edit Switch Config Template Screen. Click on the "Start From Scratch" tab to create a Configuration Template from scratch; or click on the "Select a Template" tab to select and edit an existing template and save it as a new one. When you are done, click on the Save as New Template button.
Note: Instructions for configuring a Static IP address for a specific switch (using a Serial Number Rule or MAC Address Rule) are displayed when you bring up the Configuration Template. Follow the instructions if you want to configure a Static IP Address in the template. The instructions are commented out. You can delete them or just configure the template below them.
Note: You cannot configure a Static IP address that is assigned to a device in the Managed Devices List. You must first delete that device from the Managed Devices List before using that IP address. If a device serial number (or a device with same IP address) already exists in the Managed Devices List, it must first be deleted from the Managed Devices List before it can be onboarded again.
The Configuration Template is created using CLI syntax. A Configuration Template is a set of commands that are read by the switch on reloading. A template can be static or dynamic. A Static Template (see sample below) is a template without variables. It is useful for deployments where all switches can work with exactly the same configurations. The IP address is typically given by a DHCP server in such a deployment.
Note: Certain commands that are handled by the Configuration Manager in AOS cannot be included in a Configuration Template (e.g., user admin password, write memory, configuration apply). If these commands are included in a Configuration Template, provisioning will fail. If provisioning fails for any reason, go to the Results Screen and check the "Last Provision Message" column for more information. You can also view the Resource Manager Client Service Log in the Audit application (Administration - Audit) for more details. Click on the "Configuration" link on the left-hand side of the screen, then select "resource-manager-client-service". If the Configuration Template is the problem, make any necessary updates to the Configuration Template, and save it. The next time the switch contacts the OmniVista Server, provisioning should be successful.
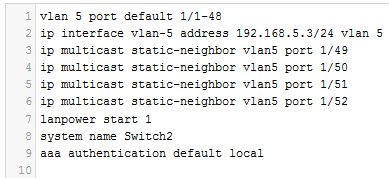
A Dynamic Template (see sample below) is a template with variables. It allows you to reuse the same Configuration Template even though different switches might need different values for some configurations. For example, different branches of an enterprise might use a different subnet range or VLAN.

Note: Special characters cannot be used when creating mapping variables (e.g., @ # +). OmniVista will ignore special characters. For example, "$test" is a correct mapping variable format. "$test@#+" will also be read as "$test" by OmniVista. Also note that mapping variables cannot have spaces. If required, multi-word variables must be separated by an underscore (e.g., $test_1, not $test 1 or $test-1).
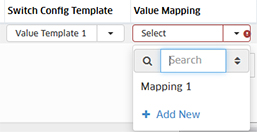
A Dynamic Template requires value mapping for the variables in the template. Value Mapping is configured using the Value Mapping field in the Rules List. If the Configuration Template you selected contains variables, the Value Mapping field for the Rule will be activated. If you have already created a Value Mapping Template that you want to associate with the Dynamic Template, select it from the Value Mapping drop-down (e.g., Mapping 1).
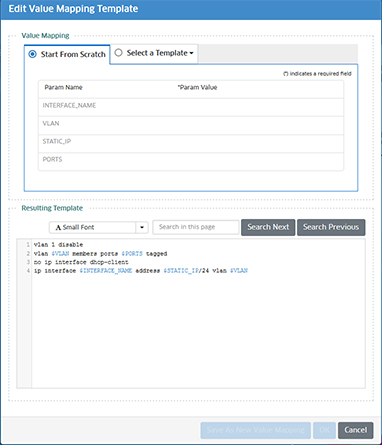
To create a new Mapping Template, click on Add New to bring up the Edit Value Mapping Template window. The variables for the Dynamic Configuration Template are displayed at the top of the window (the Dynamic Template is shown at the bottom of the window). Enter values for each of the variables and click on the Save As New Value Mapping button. You can then select that Mapping Template from the Value Mapping drop-down.
Note: If you configure Management Users in the Configuration Template, OmniVista will use the Management User credentials defined in the Management Users Template to manage the switch.
To edit an existing Configuration Template for a Rule, click on the Edit icon next to the template in the "Switch Config Template" column of the Rule. The Template Details Screen will appear displaying the current template configuration. Edit the configuration, then click on the Save button.
This change will not affect any switches that have previously matched the Rule and been successfully provisioned. The updated template will only be applied to subsequent switches connected to the network that match the Rule.
The Default Management Users Template is included in every Rule by default. You can edit the pre-configured default template and create and save custom Management Templates to include in a Rule. To edit the default template, click on the Default Mgmt Users Template button to bring up the Default Mgmt Users Template Screen. Complete the fields as described below and click on OK.
Note: When you edit a Management User Template, the changes only affect new switches during onboarding. Switches already managed in your Organization will not get the updates, even if they're using this template. To change credentials for switches that are already managed, you need to update them in the Discovery Manager Entry instead.
SNMP Settings
Configure the basic SNMP settings as described below.
Configure the SNMP User Credentials for the switch as described below. These are the credentials that OmniVista will use to log into and manage the switch. You can create new SNMP User Credentials to access the switch, or used existing SNMP User Credential switch credentials to access the switch.
Configure the CLI/FTP Credentials for the switch as described below.
Note: If no Rule is defined for a switch, and the switch username/password is different than the one defined in the SNMP User Setup in the Default Management Users Template, OmniVista will be unable to connect to the switch and provisioning will fail. The switch will be displayed on the Results Screen with a Provisioning Status of "Failed". If this happens, configure a Rule for the switch using the "Use existing credentials" option under "Other Access Methods" on the Management Users Template, and "Force Provision" the switch. See the Results Screen online help for more information on "Force Provisioning".
Change Default Password of Admin User
Switches calling home to OmniVista running AOS 8.10R04 or later must change the default "admin" user password. If they are still using the default password, you must set a new one; otherwise, the switches will fail to onboard. For earlier AOS 8.x versions, this step is optional but strongly recommended for security.
You can create a Custom Management Template when creating a Rule. Click on the Add icon at the top of the Rules List to create the new Rule. Go to the "Mgmt Users Template" column in the Rules Table, click on the drop-down arrow and select Add New to bring up the Edit Management Users Template Screen. Complete the fields as described above, click on the Save As New Template button, enter a name for the Rule, and click Save. The new Management Template can then be selected from the drop-down.
Note: If a switch matches a Rule but the switch username/password are different than the credentials defined in the Management Users Template, OmniVista will be unable to connect to the switch and provisioning will fail. The switch will be displayed on the Results Screen with a Provisioning Status of "Failed". If this happens, configure a Rule for the switch using the "Use existing credentials" option under "Other Access Methods on the Management Users Template, and "Force Provision" the switch. See the Results Screen online help for more information on "Force Provisioning".
Select a Rule in the Rules Table and click on the Edit icon at the top of the table. The Rule will move to the top of the table and all of the Rule fields will be activated above it. Edit any fields as necessary, then click on the small Edit icon to the left of the Rule.
This change will not affect any switches that have previously matched the Rule and been successfully provisioned. The updated Rule will only be applied to subsequent switches connected to the network that match the Rule. Note that if the previous Provisioning Status was "Matched", the status for this edited Rule will change to "Set Up" until a switch is connected to the network that matches the Rule.
Select a Rule(s) in the Rules list and click on the Delete icon. Click OK at the Confirmation Prompt. This will not affect any switches that were successfully provisioned after matching the Rule.