The Provisioning Results Screen displays information about all switches that have attempted provisioning through the Provisioning application. The screen is also used to configure a "Golden Configuration" for a switch and to "Force Provision a configuration to a device.
Important Note: There are switch configuration steps that must be completed to enable provisioning on a switch. See the Provisioning Overview Online Help for an overview of the application, including switch setup, configuration workflow, and troubleshooting.
The "Golden Configuration" is a configuration selected from a list of the three (3) most recent switch backups that can be applied to a switch in the event there is an unwanted configuration change. The sections below detail how to set the initial Golden Configuration for a switch and how to change an existing Golden Configuration for a switch, and how to customize a Golden Configuration for a switch. You can also audit the Golden Configuration to see if it is different than the current Running Configuration.
Note: The Golden Configuration does not include switch users, as the user database on the switch is protected from a direct read/write by any external entity including OmniVista.
Note: Golden Configurations taken prior to release Cirrrus 4.5.2 will not contain configuration snapshot information. To compare configurations of devices taken prior to release Cirrrus 4.5.2, you must create a new Golden configuration for those devices.
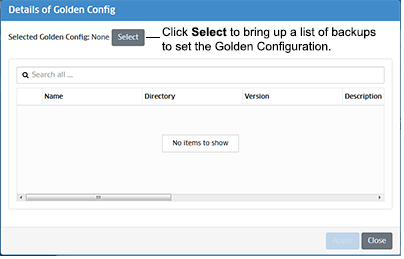
To set the initial Golden Configuration for a switch, go to the "Golden Config" column for the switch in the Results Table and click on the Edit icon in the field. The Details of Golden Config window will appear. Since a Golden Configuration has not yet been set for the switch, the fields will be empty.
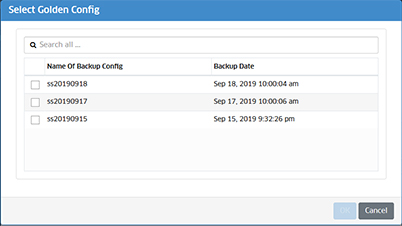
Click on the Select button. The Select Golden Configuration window will appear with a list of backups for the switch. When a switch is first provisioned, OmniVista begins daily configuration backups on the switch. The three (3) most recent backups are displayed. Select a backup from the list. (When you select a backup, a detailed view of the files contained in the backup is displayed.) Click OK, then click the Apply button to set the backup as the Golden Configuration.
The backup you selected as the Golden Configuration will appear in the "Golden Config" Column of the switch in the Results Table.
If you have already set a Golden Configuration for a switch, you can change it at any time. Go to the "Golden Config" column for the switch in the Results Table and click on the Edit icon in the field. The Details of Golden Config window will appear, with the files contained in the Current Golden Configuration displayed.
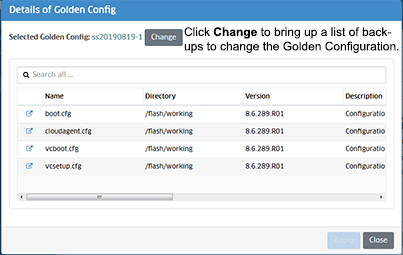
Click on the Change button. The Select Golden Configuration window will appear with the three (3) most recent backups for the switch. Select a backup from the list. (When you select a backup, a detailed view of the files contained in the backup is displayed.) Click OK, then click the Apply button to set the backup as the new Golden Configuration.
The backup you selected as the new Golden Configuration will appear in the "Golden Config" Column of the switch in the Results Table.
You can customize the Golden Configuration by editing the configuration files within the Golden Configuration backup file. Go to the "Golden Config" column for the switch in the Results Table and click on the Edit icon in the field. The Details of Golden Config window will appear, with the files contained in the Current Golden Configuration displayed.
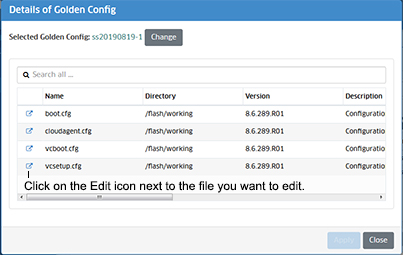
Click on the Edit icon next to the file you want to edit to bring up the Edit Backup File window. Edit the configuration file, click on the Save button, then click Close the close the window.
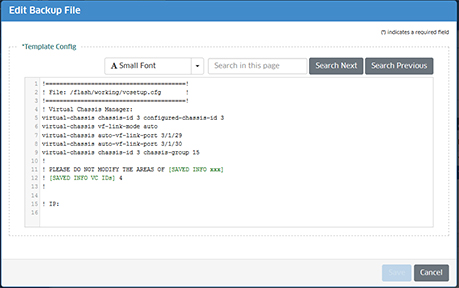
The Sync Status in the Results Table will now display Out of Sync. You can now force this new Golden Configuration to the switch or make it the new Golden Configuration as described below.
When the Golden Configuration and Running Configuration are different, an alert is displayed and the "Sync Status" column in the Results Table will display "Out of Sync". You can perform an audit to determine which configuration files are out of sync and compare the files for differences. Select the switch in the table and click on the Audit button. OmniVista will compare the Golden Configuration and the Running Configuration and highlight any files that have differences as "Out of Sync", as shown below.
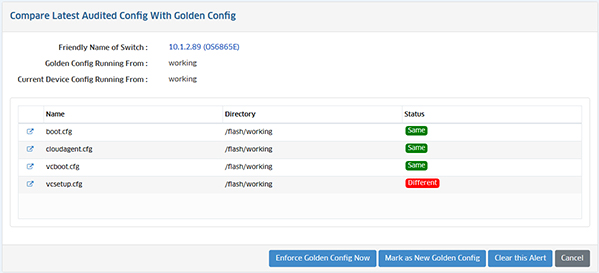
You can click on one of the options at the bottom of the screen:
Or you could click on the Edit icon to the left of the "Different" file(s) to view a file comparison of the Golden Configuration version and the Running Directory Version of the file.
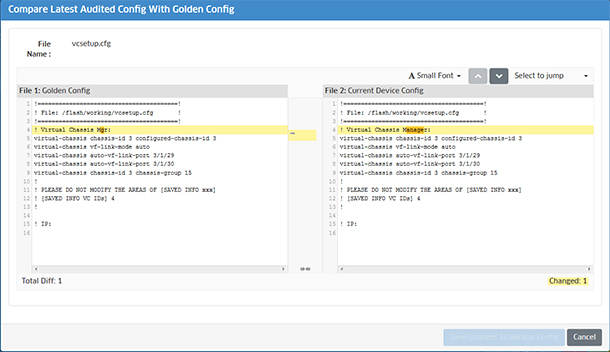
At this point you could edit the Running Configuration (Current Device Config) based on inputs from the Golden Configuration and click on the Save Changes to Backup Config button to save the changes to the Running Directory stored in OmniVista.
A switch may fail provisioning because of a problem with the configuration contained in a Configuration Template, or you may want to push a different configuration to a provisioned switch. Once a switch is provisioned through the Provisioning application, it contacts the OmniVista Cirrus Server ("Calls Home"), at regular intervals. The Force Provisioning Config button is used to push a Provisioning Rule configuration to a matching switch the next time the switch contacts the OmniVista Cirrus Server. After creating/modifying a Rule, manually push the new configuration to the switch(es) as described below.
Select a switch(es), click on the Force Provisioning Config button, then click OK at the Confirmation Prompt. The configuration will be pushed to the selected switch(es) the next time the switch contacts the OmniVista Cirrus Server.
If you decide you do not want to execute the command, click on the button, select Stop Forcing Provisioning Config, then click OK at the Confirmation Prompt to stop this process before the next "Call Home".
Note: After OmniVista issues the "Configuration Apply" command for the Configuration Template, OmniVista retrieves the status of the operation by checking the output of the "show configuration status" message. If for some reason, OmniVista is unable to receive this message (due to connectivity loss or the switch closing connection due to an SSH session timeout, for example), OmniVista will assume that the Configuration Template was successfully applied, report the provisioning process as "Successful" on the Results Screen, and add the device to the Managed Devices List.