The PolicyView application enables you to create Quality of Service (QoS) policies that specify QoS for network traffic. Policy rules are stored in a Lightweight Directory Access Protocol (LDAP) repository that is automatically installed with OmniVista and resides on the same device as the OmniVista Server. QoS-qualified devices in the network are notified when new or modified Policy rules are available on the LDAP repository via an SNMP interface. Software resident in the switch is responsible for retrieving the Policy rules from the LDAP repository, interpreting the Policy rules, and enforcing them on the switch.
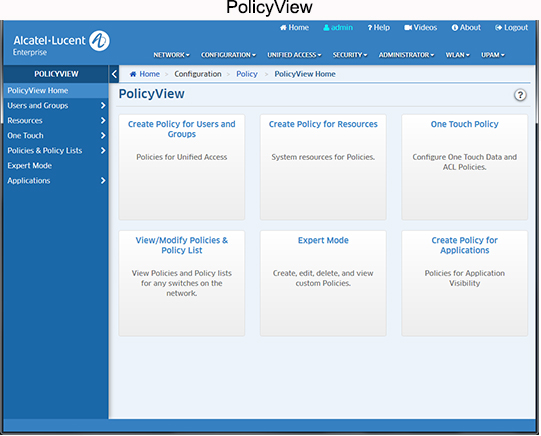
When you first open the PolicyView application, links to the following options are displayed: Create Policies for Users and Groups, Create Policies for Resources, Create One Touch Policies, View/Modify Policies and Policy Lists, Expert Mode, and Create Policies for Applications.
The PolicyView application provides wizards to enable you to create specific QoS policy types (e.g., Application, Resource); and an "Expert" option that enables you to create more complex QoS Policies. These policies can be applied to all QoS-enabled devices in the list of All Discovered Devices or to selected QoS-enabled devices. These policies are created by associating a "Condition" with an "Action." A condition specifies criteria that, when true, will cause traffic to flow as specified by the associated action. A condition can specify criteria such as the following (a limited example):
An action specifies the treatment traffic is to receive when the criteria specified by the condition are true. This treatment may include the priority and bandwidth to be allocated to the traffic, its minimum and maximum output rates, and the manner in which packets are tagged upon egress from the switch (if at all).
The PolicyView application also provides a simplified "One Touch" mode that enables you to create QoS policies for data traffic and Access Control Lists (ACLs) with minimal effort and maximum simplicity. If you use the One Touch option to create QoS policies for your network, there is no need to understand the underlying QoS definitions and constructs. The One Touch modes enable you to create QoS policies without bothering with the normal complexity associated with QoS. All QoS policies created using One Touch Policies are automatically applied to all QoS-enabled devices in the list of All Discovered Devices (Topology application).
The PolicyView application supports Provisioned QoS actions. By default, Provisioned QoS provides best-effort QoS in the switch. A Provisioned QoS action enables you to provide traffic with QoS other than best effort and to define the network resources, such as bandwidth and priority, to be made available to the traffic. When the criteria defined by the associated condition are true, traffic will be assigned to a queue that delivers the QoS specified by the action.
Important Note: Enabling Open Flow will consume all available TCAM resources. If Open Flow is enabled, you will be unable to configure QoS Policies. Any policies created before Open Flow is enabled will still function. However, you will be unable to create new policies.
The Users and Groups Policy is used to create/edit Unified Access Policies. Unified Policies are QoS Policies that can be applied to both wireline and wireless devices. For more information on creating Resources, click here.
The Resource Policy option is used to create/edit system resources for QoS Policies. Although you can use Policy View Expert Mode to create Policies for User Network Profiles (UNP), this can be time consuming. The Resource Policy option can be used to quickly create resources and resource groups that can be turned into Policies and added to Policy Lists. For more information on creating Resources, click here.
PolicyView provides a One Touch option that enables you to create One Touch Data and One Touch ACL Policies for traffic with minimal effort and maximum simplicity. One Touch Data policies enable you to assign a desired quality of service - Platinum, Gold, Silver, or Bronze - to all traffic flowing to, and originating from, specific data servers. One Touch ACL Policies enable you to create ACL Policies to all traffic flowing to, and originating from, specific Network Groups. For more information on One Touch Policies, click here.
This option enables you to view and modify all Policies and Policy Lists stored in the LDAP Server. To view the policies, click on the Select Devices button to open the Device Selection Wizard and select the switches you want to view. The devices will appear in the Selected Devices Table. Select a device in the table to display the Policies and Policy Rules for the selected device. For more information, click here.
In the Expert mode, conditions and actions are not created automatically; and the user defines the devices to which the policies are assigned. The Expert mode enables you to create conditions and actions manually, by specifying each individual parameter. In the Expert mode, you can create conditions that specify MAC addresses, IP address, protocols, VLAN IDs, specific DSCP or TOS values, or specific 802.1 priority values. For more information on creating policies on the Expert mode, click here.
This option enables you to create Application Visibility Policies and Policy Lists for Application traffic flows. For more information on Application Visibility Policies, click here.
A QoS-qualified device is a device that can support the PolicyView application and provisioned QoS. AOS devices are qualified devices. QoS-qualified devices are identified during the discovery process. The list of QoS-qualified is available and can be displayed on Expert Mode Screen.
When PolicyView is executed, it writes the address of the LDAP repository to each QoS-qualified switch in the Inventory List in the Discovery application. The LDAP address is written to the running configuration of the switch. For this reason, once PolicyView has executed, all switches are left with their running configuration in the "Unsaved" state (indicating that the running configuration has changes that have not been saved to the working directory). When a switch reboots, its running configuration is lost, so it is important to save the running configuration, and then to save the running configuration to the certified directory after PolicyView has executed. To do this, follow the steps below.
Note: All changes made to the switch configuration will be saved, including any changes made via the CLI, WebView, or other OmniVista applications, in addition to the changes made by the PolicyView application.
1. Go to the Discovery application to view all discovered devices in the Inventory List.
2. Scroll right to the "Changes" column and sort the list according to the switch configuration state.
3. Select all switches with "Unsaved" changes. Click on the Operations icon at the top of the list and select Save to Running. The "Changes" field will display "Uncertified" when the changes are saved to the Running directory.
4. Select all switches with "Uncertified" changes. Click on the Operations icon at the top of the list and select Copy Working/Running to Certified. The "Changes" column will go blank when the Working/Running Directory is saved to the Certified Directory (this may take a few minutes).
Note: You could also perform the operation above using the operations in the Topology application.
You must configure the switches in the network to send OmniVista the traps that are needed by the PolicyView application. To configure traps for one or more devices, go to the Topology application, select the device(s) and select Notifications - Configure Traps from the Operations panel. The Trap Configuration Wizard appears with the selected switches. PolicyView requires the following traps:
Note: See the Topology application help for step-by-step instructions for configuring traps.
PolicyView enables you to define the precedence of policies created in PolicyView. A policy rule's precedence determines which policy will take effect in the rare case of a conflict. QoS policies can be created through the CLI, through WebView, and through SNMP MIB browsers as well as through PolicyView. Policies created through the CLI, WebView, or MIB browsers are not written to the LDAP repository and are not manageable through the PolicyView application.
Important Note: If you are using OmniVista to create policies, do not use any outside management tools (including the CLI) to create/edit policies, conditions, or actions.
Policies created in PolicyView are assigned a precedence value between 30001-65535. However, precedence values 30001-65535 are not reserved for PolicyView policies. Policies can also be created using the CLI, WebView, or a MIB browser, and these policies can be assigned any precedence value between 0-65535. Therefore, it is possible to assign these policies the same precedence that is assigned to policies created through the PolicyView application. For this reason, if you are creating policies using PolicyView as well as outside management tools (which is NOT recommended), do not assign precedence values between 30001-65535 to any policies created outside of the PolicyView application.