OmniVista Cirrus User Interface
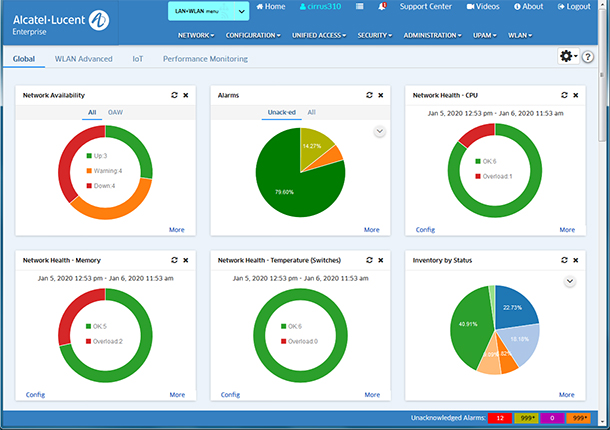
The OmniVista® Cirrus Home Page displays a dashboard with application widgets that provide an overview of key applications. The widgets also link directly to their application, so you can access the application for more detailed information/configuration. Application drop-down menus (e.g., Network, Configuration) are displayed at the top of the screen. Click on a application menu to view sub-menus and navigate through OmniVista Cirrus applications. The sections below provide an overview of the OmniVista Cirrus User Interface, including:
Note: See the Dashboard online help for more information on dashboard widgets and configuring the dashboard.
The following links are also available on the Home Page and at the top of every screen in OmniVista Cirrus:
- LAN/WLAN Menu Option - By default, all application drop-down menus (for both LAN and WLAN Devices) are displayed ("LAN+WLAN Menu"). You can click on the LAN/WLAN Menu drop-down and select "WLAN Menu" to display application drop-down menus specific to WLAN devices (e.g., SSIDs, APs). The Banner will turn gray, indicating you are in WLAN Menu Mode. .
- Home - Returns the user to the Home Page.
- Admin - Displays the current user (e.g., fat2). Click to bring up the User Management Screen.
- Application Results - Displays a list of user actions taken in the Device Catalog and SSIDs applications (e.g., Remove/License/Unlicense a device, create/edit/delete SSID). Click on the Copy button to save the list of actions to the clipboard. At this time, this feature is only supported in the Device Catalog and SSIDs applications.
- Unsaved Device Notifications - If any managed devices have unsaved changes in the Working Directory, a number will appear on the Unsaved Device Notifications icon (Bell). Click on the icon to view the number of devices with unsaved changes. Click on the Save icon, then click OK at the Confirmation Prompt to save the changes to the devices. There is also an option to ignore unsaved changes for Stellar APs. Unsaved changes on Stellar APs are generally not a problem since Stellar APs receive the latest configuration at reboot. To prevent notifications for unsaved changes on Stellar APs, click on Settings, uncheck the "Unsaved Changes Notification for Stellar Access Points" checkbox, and click OK.
- Support Center - Takes you to the OmniVista Cirrus Home Page (Service Status, Help Search).
- Videos - Launches the Alcatel-Lucent Enterprise YouTube Demo Playlist.
- About - Displays basic OmniVista Cirrus information (e.g., build number and date).
- Logout - Logs you out of OmniVista Cirrus.
Applications
Applications in OmniVista Cirrus are organized as shown below. By default, all application drop-down menus (for both LAN and WLAN Devices) are displayed in the LAN+WLAN Menu. If the WLAN Menu is selected, application drop-down menus specific to WLAN devices are displayed (e.g., SSIDs, APs) to make it easier for the user to locate WLAN-specific applications. Note that there is no change to the content within the applications (i.e., the applications have not been modified to be "WLAN-specific"). The applications accessed through the WLAN Menu and the LAN+WLAN Menu are the same. The menus are organized as described below.
LAN+WLAN Menu
Network
- Inventory
- Topology
- AP Registration
- Locater
- Notifications
- Analytics
- Application Visibility
- Provisioning
- IoT
Configuration
- VLANs
- CLI Scripting
- Captive Portal
- Groups
- Report
- Configuration Manager
Unified Access
- Unified Profile
- Unified Policy
- Multimedia Services
Security
- Users and User Groups
- Authentication Servers
- External Apps
Administration
- Control Panel
- Preferences
- Audit
- License
- Multi-Tenancy Service
UPAM
- Summary
- Authentication
- Guest Access
- BYOD Access
- Settings
- Web Content Filtering
WLAN
- SSIDs
- Wireless Intrusion Protection System (WIPS)
- RF Management
- Heat Map
- Floor Plan
- Client
WLAN Menu
SSIDs
- SSIDs
- WLAN Service (Expert)
APs
- Inventory
- Topology
- VLANs
- Configuration Manager
- SSH/Telnet
- Heat Map
- Floor Plan
- IoT/Location Server
- Data VPN Servers
Analytics
- Analytics Reports
- AV-Devices Management
- AV-Signature Files
- AV-Signature Profiles
- AV-Summary View
Clients
- Summary
- Client List
- Client Session
- Client Blocklist
- Locator
- Access Records
Guest/BYOD
- Guest Access
- BYOD Access
- Captive Portal
Authentication
- Policy
- NAS Clients
- Certificates
- Accounts
- Authentication Servers
- External Servers
Policies
- ACL/QoS
- Unified Profile
- Resource Groups
- Device Config
RF
- RF Home
- RF Profile
- RF Scan View
Security
- Users and User Groups
- Wireless Intrusion Protection System (WIPS)
- External Apps
- Web Content Filtering
Alarms/Logs
Administration
- Report
- Control Panel
- Preferences
- Licenses
- Multi-Tenancy Service
Configuration/Display Buttons
OmniVista Cirrus provides standard tools for interacting with configuration/display screens. These buttons include:
Configuration Buttons |

|
Create/Add
Click the Create/Add button to create a new entry within the configuration screen. |
 |
Edit
To edit an existing entry, select the entry in the configuration screen and click the Edit button. |
 |
Copy/Duplicate
Used to duplicate an existing entry in a list or table. Select an entry in a table, and click on the Copy/Duplicate button to bring up a configuration screen with the selected configuration. You can then modify certain fields to quickly create a new entry. This can save time when creating multiple entries with similar configurations |

|
Clone
Used to duplicate an existing entry in a list or table. Select an entry in a table, and click on the Clone button to bring up a configuration screen with the selected configuration. You can then modify certain fields to quickly create a new entry. This can save time when creating multiple entries with similar configurations. |

|
Delete
To delete an entry, select the entry and click the Delete button. |
Table Buttons |

|
Table View
Table view organizes configuration screens in a table-based layout that is viewed and sorted similar to a spreadsheet. Table data may be exported to CSV files. |

|
List View
List View organizes information and configuration tasks in a list view. Note that information displayed in List View cannot be Printed via the OmniVista Cirrus Print button. To print information from a particular screen, switch to Table View (if available). |

|
Settings
Used to configure the column headings to display in a table, Click on the Settings button and select the column headings you want to display. |

|
Refresh
The Refresh button loads the latest data for an application table, chart or list. |

|
Help
Click on the Help button to load for a context-sensitive walk-through of an application, table or configuration screen. |

|
Search
Click the Search button and enter search criteria in the "Search..." field to display specific entries in the table. Click on the "x" to the right to return to the original display.
|

|
Filter
Users can create custom filters for OmniVista Cirrus tables to display specific data. To create a custom filter:
- Click the filter button.
- In the Filter screen, click Add.
- Enter a Filter Name for the custom filter.
- Enter a Filter Description for the filter.
- In the Conditions area, for “Filter elements where ... of the following apply”, specify the strictness of the conditions (e.g., display results if ANY condition is encountered, or only display results if ALL of the conditions are encountered).
- Select an option from the application-specific conditions list. This automatically enables the conditions.
- Next, fine-tune conditions by selecting options under the following pull down menus:
- have/not have
- Name - select a column heading to use in the filter.
- contains
- begins with
- ends with
- equal
- not equal
- [enter value] - enter a specific text string
- non-case sensitive/case sensitive
- Additional application-specific conditions may be added to the conditions outlined in the previous step by clicking the “Add new Condition” link.
- You can also add a completely new group of conditions by clicking the Add icon and repeating the steps outlined above.
|
 |
Reset
Click the Reset button after filtering a table to return to the original display.
|
 |
Export to CSV
Click the CSV button to download information displayed in Table View to a CSV (spreadsheet) file. |
 |
Add To Report
Click to create a report for the page. These reports are PDF versions of tables and reports generated in certain OmniVista Cirrus applications. Basically, in addition to viewing information in real-time, you can generate PDFs of the screens. When a report is generated, it takes a current snapshot of the application information. These reports can be generated immediately or you can schedule them to be generated at regular times/intervals (e.g., Daily, Weekly). You can also configure a report to be e-mailed when it is generated. Reports are configured in the Report application.
|
 |
Print
Print Table View information by clicking the Print button. Note that information displayed in List View cannot be Printed via the OmniVista Cirrus Print button (button is not available). To print information from a screen, switch to Table View (if available). |
 |
Full Screen
Change screen view to Full Screen. |
Working with Tables
Information in OmniVista Cirrus is primarily presented in table format. The general functionality of each area is described below. Details for each button are provided in the Configuration/Display Buttons section.
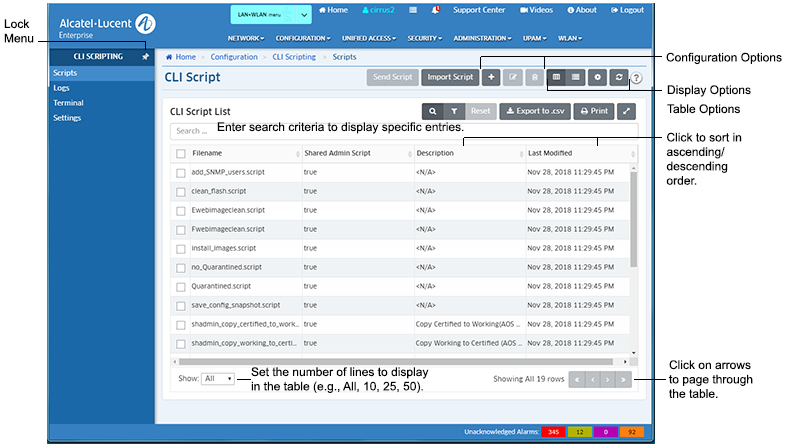
- Configuration Options - Used to create, edit, delete entries (e.g., create, edit, delete a CLI Script). Details for each button are provided in the Configuration/Display Buttons section.
- Display Options - Used to change the table display from Table View to List view, to set the columns you want to display, and to refresh the data in the table. Details for each button are provided in the Configuration/Display Buttons section.
- Table Options - You can filter the data that is displayed by clicking on the Filter icon and selecting/creating a filter. You can also export the table into a .csv file, print the table, or change the screen view to Full Screen Mode. Details for each button are provided in the Configuration/Display Buttons section.
- Search - Enter search criteria in the Search... field to display specific entries in a table. As you enter criteria, only those entries matching the criteria will appear in the table. Click on the Reset button to return to the original table display.
- Sort - Click on one of the arrows at the top of a column to sort the table in ascending or descending order based on the column.
- Set Lines to Display/Page Through Table - Set the number of lines to display in the table using the Show drop-down menu at the bottom left corner of the table. You can also page through a large table using the arrows at the bottom right corner of the table.
On most screens, all configured items are displayed in a table. As show above, you can search or sort to display specific items. Applications with larger tables (e.g., VLANs) do not display data by default. You must select the devices/AP Groups you want to display in the table. These applications feature a Device Selection Bar at the top of the table (shown below). Click on the Devices ADD button and/or the AP Groups ADD button to select the devices you want to display.

To change the display, click on the Devices EDIT button and/or the AP Groups EDIT button to add/remove devices/AP Groups.

Your device selection will remain persistent until you change it or log out of OmniVista Cirrus. If you log out, the default setting (no display) returns.