Switch User Account
The Switch User Account Screen displays all users configured for Authenticated Switch Access (ASA) through UPAM and is used to create, edit, and delete switch user accounts. You can also enable/disable the UPAM local database for ASA, and enable/disable an existing Switch User Account. After creating a switch user, you create a AAA Profile for the user, setting UPAM as the server used for switch access, and assign the AAA Profile to network switches. See UPAM Authenticated Switch Access Workflow for more details.
Creating a User
Complete the fields as described below and click on the Create button to create a new user. You can also create multiple accounts by importing an Excel or .CSV file.
- Username - The user's username to access a switch.
- Description - Optional description for the user.
- First Name - The user's first name (optional).
- Last Name - The user's last name (optional).
- Email - The user's contact email (optional).
- Password - The user password to access a switch.
- Repeat Password - Re-enter the user password.
- Privileges - Select the access level for the user:
- Read/Write - Read/Write access for all Domain Families (e.g., System Domain, Physical Domain) on the switch. (Default)
- Read Only - Read Only access for all for all Domain Families.
- Advanced - Enables you to customize privileges for a user. When you select "Advance", BitMap representations of user privileges are displayed (e.g., Read 1, Read 2). Click on the "BitMap Calculator" link for AOS 8 and/or AOS 6 to bring up the Family Privileges Bitmap Calculator Screen (the AOS 6 screen is shown below). By default, all operations are configured as "Read/Write". Select/unselect items to customize privileges. When you are done, click OK to return to the Switch User Account Screen.
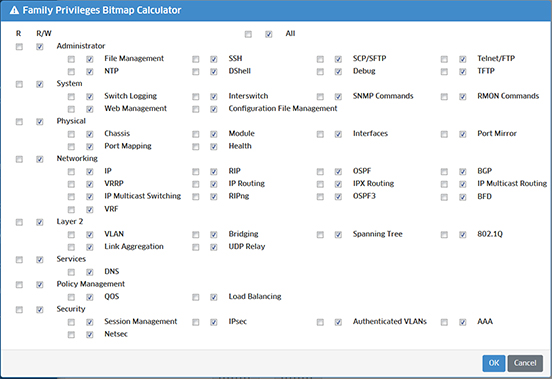
The All checkboxes at the top-center of the screen can be used to set all privileges for all groups to "Read-Only" (left checkbox) or "Read/Write" (right checkbox, selected by default). You can also set all privileges by group (e.g., Administrator, System) by selecting a checkbox next to the group name, or select individual privileges within a group. The AOS 8 screen is the same. However, instead of the All checkbox at the top-center of the screen, you have the option to select All or All Support. "All" will select all privileges, "All Support" will select all supported privileges. It is recommended that you select "All" (default). All privileges will be selected, but OmniVista will just ignore any unsupported privileges.
Importing Users
You can create multiple user accounts by importing an Excel or .CSV file containing multiple users. Click on the Import button at the top of the screen to bring up the Import File Window. If necessary, you can download a Template by clicking on the Template button. All of the necessary fields are provided in the Template. Complete the fields as described above. To import a file to OmniVista, click on the Browse button to locate the file, then click on the Import button at the bottom of the window. The users defined in the file will be added to the Switch User Account List with the default privilege of "Read/Write". You can edit the privileges as described above.
Editing a User
Select a user and click on the Edit icon. Edit the fields as described above, then click on the Apply button. You cannot edit the Username.
Deleting a User
Select a user and click on the Delete icon, then click OK at the Confirmation Prompt.
Enable/Disable the UPAM Local Database for ASA
You can enable/disable switch user authentication through the local Switch User Account Database in UPAM. By default, this option is disabled, and switch user accounts are authenticated through an external authentication server. To enable ASA using the local UPAM Database, select a username(s) and click on the Enable ASA button. To disable it, select a username(s) and click on the Disable ASA button.
The following use cases are supported:
- Using the UPAM local database for both network/switch authentication and client authentication.
- Using the UPAM local database for network/switch authentication (ASA) and an external RADIUS Server for client authentication.
- Using an external RADIUS Server for both network/switch authentication (ASA) and client authentication.
The following use case is not supported:
- Using an external RADIUS Server for network/switch authentication (ASA) and UPAM local database for client authentication.
Enable/Disable a Switch User Account
When a Switch User Account is created, it is enabled by default. You can disable a user account by selecting the account(s) and clicking on the Disable icon at the top of the screen. The user(s) will no longer have access to network switches through UPAM. To enable a disabled account, select the disabled account(s) and click on the Enable icon at the top of the screen. The user(s) will again have access to network switches through UPAM.
Switch User Account List
- Username - The user's username to access a switch.
- Description - Optional description for the user.
- First Name - The user's first name (optional).
- Last Name - The user's last name (optional).
- Email - The user's contact email (optional).
- Effective Date - The date the user account was created. .
- Status - The account administrative status (Enabled/Disabled).
UPAM Authenticated Switch Access Workflow
Follow the steps below to configure UPAM Authenticated Switch Access (ASA) for a user and assign UPAM ASA to network switches.
1. Create a Switch User as described above.
2. Go to the AAA Profile Screen (Unified Access - Unified Profile - Template - Global Configuration - AAA).
3. Enter the Switch User's Username in the AAA Name field.
4. Click on "User's Access to Switches" enable ASA and open the configuration pane.
5. In the Authentication Servers section, set the UPAM Server as the ASA Server for each type of switch access. Setting the Default Authentication to the UPAM Server configures the UPAM Server for all access types.
6. Click on the Create button.
7. Select the User you just created in the AAA Profile List and click on the Apply to Devices button. The Assign AAA Screen will appear.
8. Click on the Add button and select switches.
9. Click on the Assign button.
Note: See the AAA Profile Online Help for more information.