The ProActive Lifecycle Management (PALM) Feature periodically gathers detailed information for all discovered devices on your network and periodically uploads the information to the PALM web portal. Basic inventory information is also available through a widget that can be displayed on the OmniVista Dashboard for easy reference. Information is gathered and sent to the web portal. After the initial upload, updated information is sent to the web portal every two (2) weeks.
Note: You must have a PALM account set up before using the feature. Contact your Business Partner or Alcatel-Lucent Enterprise Customer Support for more information. Also note that if you choose not to enable the PALM Feature at installation, you can enable it at a later time in the Preferences application.
After installing OmniVista you must enable PALM (if necessary), and add the ProActive Lifecycle Management Widget on the OmniVista Dashboard.
During OmniVista 2500 NMS installation, users have the option to enable PALM on the License Agreement Screen. If you enabled PALM at installation, go to Adding the ProActive Lifecycle Management Widget. Otherwise, follow the steps below to enable the feature.
1. Go to the Preferences - System Settings - ProActive Lifecycle Management Screen.
2. Click on the ProActive Lifecycle Management slider to enable the feature. Accept the License Agreement and click the Apply Button.
3. After clicking Apply, a "Verify Proxy Configuration" link will appear to enable you verify/update your proxy settings. If necessary, click on the link to go to the Preferences - System Settings - Proxy Screen to view/change proxy settings.
Note: In addition to the PALM option presented during OmniVista 2500 NMS installation, you will be prompted to enable PALM whenever you add/relicense an OmniVista Core License in the License application.
The PALM Widget can be displayed on the OmniVista 2500 NMS Dashboard. The widget provides basic inventory information. Follow the steps below to add the widget to the Dashboard.
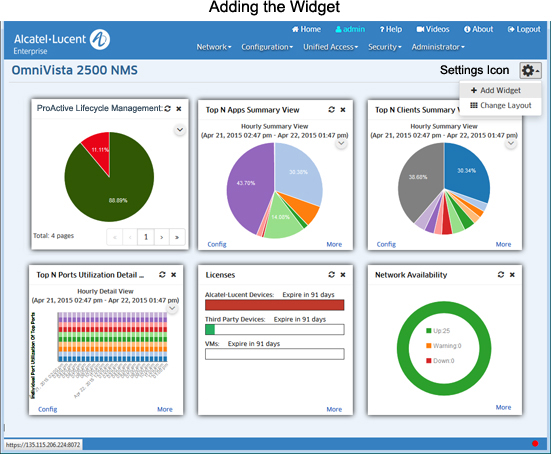
1. On the OmniVista 2500 NMS Dashboard, click on the Settings icon and select Add Widget.
2. Scroll down the list of widgets, select ProActive Lifecycle Management and click OK. The widget will appear on the Dashboard.
Note: The ProActive Lifecycle Management Widget is activated after the initial data upload, which occurs within two weeks of installation. Once the initial upload is complete, information is displayed in the widget.
Information is displayed in the ProActive Lifecycle Management Widget. A series of pie charts provide an overview of devices on your network. For a more detailed view, you can click on the widget to go to the PALM web portal.
The ProActive Lifecycle Management Widget includes a series of pie charts that provide a quick overview devices on your network. The example below shows the Operating System Release Screen. Hover over a section to view basic information (e.g., number of network devices supported/not supported). Click on the arrows (>>) to scroll through the different screens. Click on a pie chart to go to the PALM web portal for a more detailed view. The information in each pie chart is defined below.

The ProActive Lifecycle Management web portal provides detailed information for your network devices. Click on any of the pie charts in the ProActive Lifecycle Management Widget to go to the web portal (login is required the first time you access the portal). The initial screen displays the same pie charts displayed on the OmniVista Dashboard. Click on any of the pie charts and scroll down to the bottom of the screen to view detailed information.
After the initial data upload, OmniVista 2500 NMS sends updated information to the PALM web portal every two weeks. However, you can manually initiate a data upload at any time on the ProActive Lifecycle Management Screen in the Preferences Application. Go to the Preferences - System Settings - ProActive Lifecycle Management Screen and click on the Upload Now button.
The table below provides a list of the specific information gathered and uploaded by the PALM Feature.
|
Information Category |
Description |
|
OV Server |
Version of OmniVista |
|
|
MAC Address of OmniVista |
|
|
OmniVista ID |
|
|
OmniVista License Key |
|
Device |
Device Name |
|
|
Device License Key |
|
|
Device Model |
|
|
Device MAC Address |
|
|
Device Modules |
|
|
Device Last Known Update Time |
|
|
Device Chassis |
|
|
Chassis ID |
|
|
Chassis Serial Number |
|
|
Chassis Administrative Status |
|
|
Chassis Operational Status |
|
Modules |
Module MAC Address |
|
|
Module Serial Number |
|
|
Module Name |
|
|
Module Description |
|
|
Module Uboot Version |
|
|
Module Index |
|
|
Module Hardware Version |
|
|
Module Model |
|
|
Module Firmware Version |
|
|
Module Software Version |