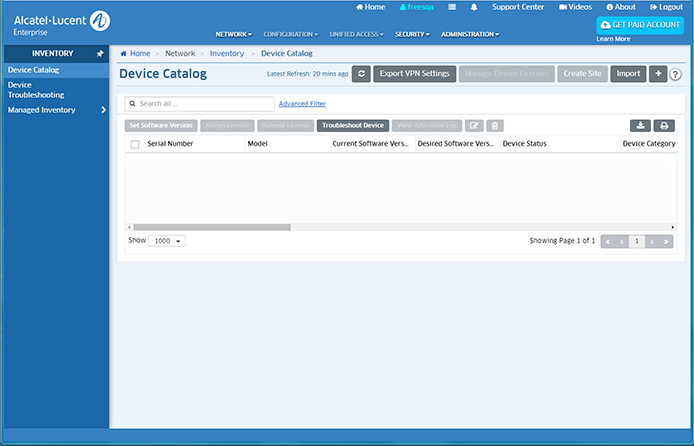
Device Catalog
The Inventory Device Catalog Screen displays detailed information about all devices known to OmniVista Cirrus. It is also used to add devices, manage device licenses, create Topology Geo Location Map Sites; edit, delete, and search for devices; and perform certain operations on devices (e.g., Set Software Version, Assign/Release License). To manage a device in OmniVista Cirrus, the device must first be added to the Device Catalog. The device is then validated by the OmniVista Cirrus Server. Once the device is validated and connected to your network, it is available for limited management. With limited management, a device is displayed in the Device Catalog and you can perform one software upgrade on the device (i.e., Freemium level management). For full management, a device must be licensed. An overview of the device catalog workflow is shown below.
Note: Remote Access Points for OmniVista Enterprise are added using an OmniVista Cirrus Freemium Account. Click here for procedures on adding Remote Access Points to OmniVista Enterprise installations. See the Remote Access Point and VPN VA Installation Guide for detailed procedures on configuring Remote Access Points.

Note: There are certain prerequisites that you must verify/configure on your local network (e.g., DCHP Server, Firewall, NTP Server) and devices (e.g., OS release) for devices to communicate with OmniVista Cirrus. If you are setting up a Freemium Account, or are having trouble with devices connecting to the OmniVista Cirrus Server, verify that these prerequisites have been met.
Device Catalog Process/Workflow
An overview of the basic process flow for adding/licensing devices is shown below. OmniVista Cirrus Server processing steps are shown in gray. The device status that must be reached to move to the next step is shown in italics. Device status is displayed in real time in the Device Status column on the Device Catalog Screen. (For a Virtual Chassis, each device in the Virtual Chassis reflects the status of the Master Chassis.) Note that a device may go through several intermediate steps (e.g., Upgrading) before reaching a final step (e.g., OV Managed). Detailed device status information is provided below.
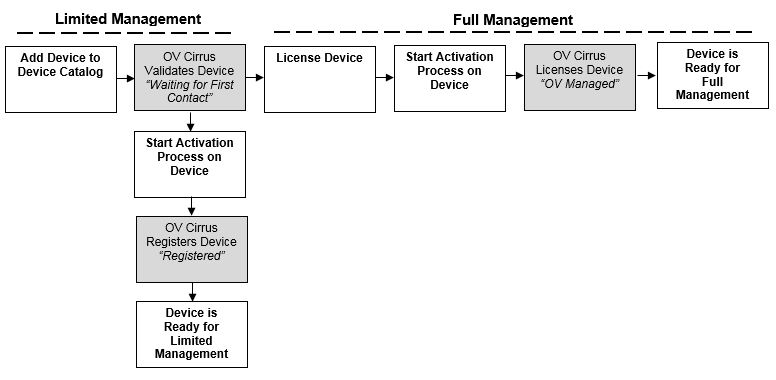
The steps for adding devices to the Device Catalog are shown below. The steps must be performed in order. If you are adding a device for limited management, you do not have to license the device, just add the device and start the activation process. If you are adding a device for full management, complete all of the steps.
- Adding Devices to the Device Catalog
- Licensing Devices
- Starting the Activation Process on Devices
Note: If you have enabled automatic licensing, Step 2 is not required. An available license will be automatically assigned to the device after it is added. The Automatic Licensing Option is presented when you upgrade to a Trial or Paid Account. It can also be enabled at any time in the Device Catalog License Wizard.
Note: If a device supports the Automatic Call Home Feature, Step 3 is not required. The device will automatically contact the OmniVista Server at the configured Call Home Interval (Default = 5 minutes) and initiate the activation process. LAN Devices running AOS 6.7.2.R04 (and later) or AOS 8.5R2 (and later), and APs running AWOS 3.0.4 MR1 support the Automatic Call Home Feature.
Adding Devices to the Device Catalog
To manage a device, you must first add the device to the Device Catalog. You add devices by inputting the serial number (and MAC address for APs) for each device. The serial numbers/MAC addresses are sent to the OmniVista Cirrus Server for validation. There are three ways you can add a device:
Note: For LAN devices, make sure the device is running a minimum software version of AOS 6.7.2.R03 or 8.4.1.R03, before adding it to the Device Catalog. For APs, make sure the device is running a minimum software version of AWOS 3.0.2.40 before adding it to the Device Catalog. Click here for instructions on upgrading device software.
Note: Click here for procedures on adding Remote Access Points to OmniVista Enterprise installations.
Manually Adding a Device
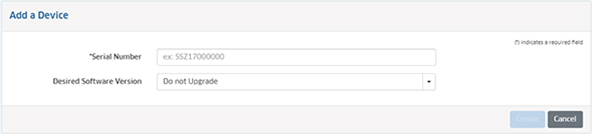
1. Click on the Add icon to bring up the Add a Device Screen.
2. Complete the fields as follows:
- Serial Number - Enter the Serial Number for the device.
- Device Type - The type of device (LAN Device, Stellar AP).
- MAC Address (APs only) - If you enter a Serial Number for an AP, enter the AP MAC address (not required or displayed for switches).
- Desired Software Version - Select a software version for the device.
Note: When upgrading OS6360, OS6465, OS6560, and OS6570M switches to AOS 8.10R4, only 8.10.87.R04 non-secure images are offered. These images do not require a U-Boot update.
- Select a Software Version - Select a specific software version from the drop-down. The device will automatically download and install the selected software version as part of the activation process. Note the selected software version must be higher than the version currently installed on the device. Also note that if the device does not support the selected software version, the "Desired Software Version" field will be set to "Do Not Upgrade" after the device is validated.
- Do Not Upgrade - Select "Do Not Upgrade" if you do not want to change the installed software on the device. If the device is part of an existing network, selecting “Do Not Upgrade” will leave your device in its current software version. If this is a new device, updating to the latest release is recommended. In general, you should only select a specific release if you understand the features of the specific release.
- Ready for Upgrade (LAN Device only) - If you set a software version, select whether or not the device will automatically download the specified software during the initial activation process. This field is used primarily to ensure proper configuration of 8.x Devices running AOS 8.6R2 and lower that are part of a VC of 2 or more. If you are adding an 8.x Device running AOS 8.6R2 and lower that is part of a VC of 2 or more, you must perform the steps detailed in the field notes (i) before adding the device.
- Unknown (Default) - When the device calls home, OmniVista determines if it is an 8.x Device running AOS 8.6R2 and lower that is part of a VC of 2 or more. Those devices are flagged to prevent the upgrade until the steps detailed in the field notes (i) are completed. Once those steps are completed, you can edit the device and set the field to "Yes". If OmniVista determines that the device is not an 8.x Device running AOS 8.6R2 and lower that is part of a VC of 2 or more, the selected software version will be downloaded when the device calls home. It is recommended that you set the device to "Unknown".
- Yes - The device will download the selected software version when it calls home.
- No - The device will not download the selected software version when it calls home.
- Initial Geo Location - To use the Topology Geo Map Feature, enter a Geo Location for the device. The device will be displayed in the Topology Geo Map based on the location. You do not have to specify a Geo Location at this time. You can edit the device at any time on the Manged Devices Screen and specify a Geo Location. See the Topology Help for more information on Geo Maps.
- Street Name - Enter a location beginning with the street name, city, etc. (OmniVista will offer suggestions as you type).
- Coordinates - Enter Latitude and Longitude of the Site.
- Initial Site - If you are using the Topology Geo Map Feature, you can select a site from the drop-down menu to place the device in a Geo Map Site. If necessary, click on Add New up the Create Site Window and create a new Geo Map Site. You can then select the new site from the drop-down menu. You do not have to specify a Geo Map Site at this time. You can create Geo Map Sites and place devices in those sites at any time. See the Topology Help for more information on Geo Maps.
4. Click on the Create button.
When you first add the devices, basic information for the device will appear in the Device Catalog with the Device Status column displaying "Waiting for Validation". (For a Virtual Chassis, each device in the Virtual Chassis reflects the status of the Master Chassis.) When the validation process successfully completes, the Device Status will display "Waiting for First Contact". (It can take a few minutes for all devices to be validated.)
5. Repeat to add any additional devices.
Bulk Import Multiple Devices
You can add multiple devices by importing a .csv file containing serial numbers (and MAC addresses for APs) for each device.
1. Click on the Import button at the top of the screen. The Import Devices Screen appears.
2. If necessary, click on the Template button to download a .csv template file (shown below). If you already have a .csv file prepared, go to Step 5 to import the file.
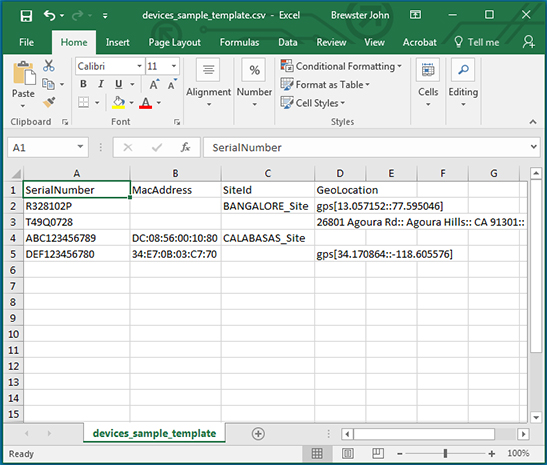
3. Use the template to create a list of device serial numbers (MAC addresses for APs), and Site IDs and Geo Locations (to use the Topology Geo Location Feature).
4. Save the template file.
5. On the Import Devices Screen, click on the Browse button to locate the file, then click on the Import button to import the file to OmniVista.
6. At the prompt, set the software version for the devices in the list.
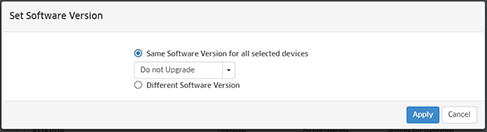
- Same Software Version for all selected devices - Select this radio button, then select a software option below to perform that option on all devices in the import file.
- Set Software Version (same model type only) - If all of the devices you are importing are the same model type, you can select the software version to be used for all devices from the Desired Software Version drop-down.
- Do Not Upgrade - Select "Do Not Upgrade" if you do not want to change the installed software on the device. This is the only option available if there are different model types in your list of imported devices.
- Different Software Version - Select this radio button to bring up a list of all of the devices in the import file. You can then set a different software operation for each device.
- Click on the drop-down list in the Desired Software Version column next to a device to bring up a list of the available software versions and select an option for the device.
- Desired Software Version - Select a specific software version for devices from the drop-down. The device will automatically download and install the selected software version as part of the activation process. Note the selected software version must be higher than the version currently installed on the device. Also note that if the device does not support the selected software version, the "Desired Software Version" field will be set to "Do Not Upgrade" after the device is validated.
If the imported devices include more than one device of a model type (e.g., there are 2 OAW-AP1221 devices and 5 OS6450-P48 devices), the list will only display one device of each model type. When you select a software version, the software will be applied to all devices of that model type.
- Do Not Upgrade - Select "Do Not Upgrade" if you do not want to change the installed software on the device.
Note: If the device is part of an existing network, selecting “Do Not Upgrade” will leave your device in its current state. If this is a new device, updating to the latest release is recommended. In general, you should only select a specific release if you understand the features of the specific release.
7. When you are done, click the Apply button.
When you first add the devices, basic information for the device will appear in the Device Catalog with the Device Status column displaying "Waiting for Validation". (For a Virtual Chassis, each device in the Virtual Chassis reflects the status of the Master Chassis.) When the validation process successfully completes, the Device Status will display "Waiting for First Contact". (It can take a few minutes for all devices to be validated.)
Adding Devices Using the OV Cirrus Assistant Mobile App
The OV Cirrus Assistant Mobile App can be used to quickly add devices to the Device Catalog. Go the Apple App Store or Google Play and download the OV Cirrus Assistant Mobile App to your phone. Follow the steps below to scan device serial numbers and device location into the Device Catalog.
1. Log into the app using your OmniVista Cirrus username and password.
2. Click on Scan to scan a serial number on a single device. Click on Batch Scan to scan serial numbers on multiple devices.
3. Aim the camera at the device's bar code or QR Code. (You must scan the QR Code for APs.) If you are scanning a single serial number, the app will return to the first screen. If you are scanning serial numbers on multiple devices, the app will "beep" after it captures a number. Continue to scan additional numbers. When you are finished, click Cancel. The app will return to the first screen.
4. You can click on Scanned Devices to verify that you have successfully captured all of the device serial numbers. The scanned devices will appear in the Device Catalog Screen.
When you first add the devices, basic information for the device will appear in the Device Catalog with the Device Status column displaying "Waiting for Validation". (For a Virtual Chassis, status is displayed in the VC Device Status column.) When the validation process successfully completes, the Device Status will display "Waiting for First Contact". (It can take a few minutes for all devices to be validated.)
Note: Devices added using the scanning app are added with the Desired Software Version field set to "Do Not Upgrade". You can edit the field at any time.
Licensing Devices
The Device Catalog Screen is also used to access the License Wizard, which is used to assign/release licenses to/from devices. If you have a Trial or Paid Account, you must license your devices to fully manage them. As part of your Trial or Paid Account, you have a specific number of device licenses. Licenses can be assigned/released to/from a device at any time. For example, you may want to remove a license from one device (making it a limited management device) and assign that license to another device (making it a full management device).
Note: If you have enabled automatic licensing, an available license will be automatically be assigned to a device after it is added. The Automatic Licensing Option is presented when you upgrade to a Trial or Paid Account. It can also be enabled at any time in the Device Catalog License Wizard.
1. Click on the Manage Device Licenses button to bring up the first screen of the License Wizard (shown below).
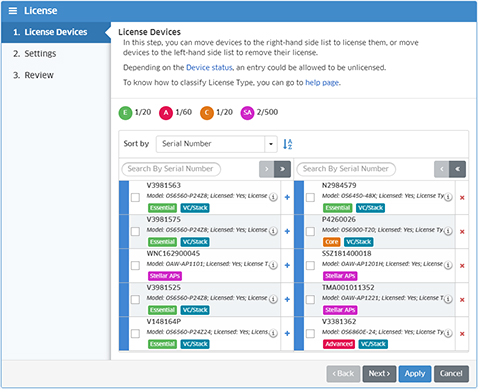
Unlicensed devices appear on the left side of the screen. License devices appear on the right side of the screen. The Device License type is displayed underneath the device description. There are different License Types (e.g., E - Essential Switch, A - Advanced Switch) for different devices types (e.g., OS6350, OS6865). The number of licenses used for each type is shown at the top of the screen (e.g., E 1/10, A 3/10).
2. To license a device, click on the Add icon to move the device from the left side of the screen to the right side. Select the device(s) you want to license and click Next.
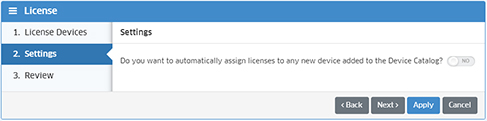
3. The Settings Screen (above) displays the current Automatic Licensing setting and can be used to enable/disable the feature. Click Next.
 .
.
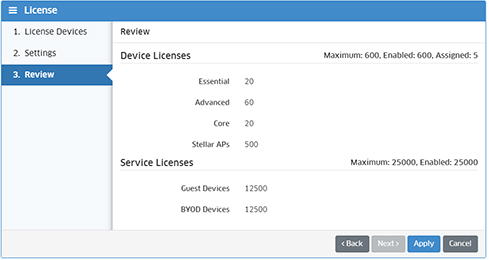
4. Review the license configuration, then click Apply, then click OK on Assign & Release License - Confirmation prompt. Once devices are licensed, you can manage them in OmniVista Cirrus.
Note: To remove a license from a device, click on the Remove icon to move the device from the right side to the left side of the screen.
You can also assign/release licenses to/from a device by selecting the device(s) in the Device Catalog and clicking on the Assign License or Release License button at the top of the Device Catalog. The License Wizard will open with the selected devices displayed in the applicable column. Click OK to complete the action (Assign/Release), then click OK on the Assign & Release License - Confirmation Screen Page.
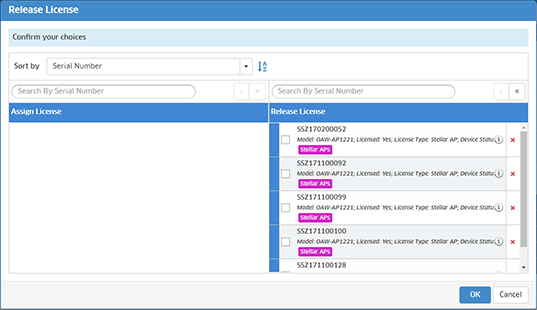
For example, if you wanted to release license(s) from a group of devices, you would select the devices in the Device Catalog and click on the Release License button. The License Wizard would open with the selected licensed devices displayed in the Release License column. Click OK to release the licenses, then click OK on Assign & Release License - Confirmation prompt.
Note: Any time you add/remove licenses for device that are already connected to the network, you must restart the activation process on the affected devices (both the devices you add the license to and the devices you removed the license from).
License Types
There are different licenses for different device types.A full list of supported devices/releases can be found here. When you select a switch in the License Wizard, the applicable license is applied to the device.
- Essential Switches (e.g., OS6350, OS6450, OS6560)
- Advanced Switches (e.g., OS6860, OS6860E, OS6860N)
- Core Switches (e.g., OS6900, OS6900-C32/V72, OS6900-T48/X48)
- Stellar APs (e.g., OAW-AP1101, OAW-AP1201, OAW-AP1321)
Creating Topology Geo Map Sites
The Topology application provides an Geo Map view to display devices in a Geo Map. When a device is added to OmniVista Cirrus, you have the option of adding a Geo Map location for the device (either street address or Latitude/Longitude). The device will then be displayed in a Geo Map view in the specified physical location. You can also create Map Sites (e.g., Data Center, Campus Building), place them in a specific Geo Location and add devices to those sites. Click on the Create Site button to create a Topology Geo Location Map site for devices. When you click on the button the Create Site Window appears.
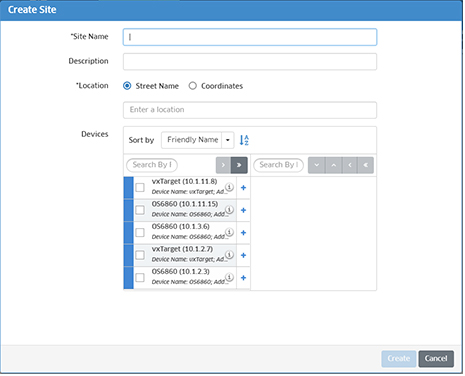
Complete the fields below and click on the Create button to create a new Site.
- Site Name - User-configured name for the Site.
- Location
- Street Name - Enter a location beginning with the street name, city, etc. (OmniVista will offer suggestions as you type).
- Coordinates - Enter Latitude and Longitude of the Site.
- Description - Optional description for the Site.
- Devices - Any devices that have not yet been assigned to a Site will be displayed on the left. Move the devices to the right to add them to the Site. Note that you can create a site without adding devices. Devices can be added later. Also note that a device can only belong to one Site. To move a device to another Site, you must remove it before adding it to another site.
Note: See the Topology Help for more information.
Automatic Call Home Feature
LAN Devices running AOS 6.7.2.R04 (and later) or AOS 8.5R2 (and later), and AP running AWOS 3.0.4 MR1 support the Automatic Call Home Feature. These devices automatically contact the OmniVista Cirrus Server at regular intervals. For these devices, there is no need to manually start or restart the activation process. The devices will automatically contact the OmniVista Server at the configured Call Home interval. The exception to this is for new, "out of the box" devices running AOS 8.6R1 or lower on which the Automatic Call Home Feature is disabled by default. In this case, you must manually enable the Automatic Call Home feature on the device as follows:
- Telnet to the device running AOS 8.6R1 or lower and disable the Cloud Agent using the following CLI command:
cloud-agent admin-state disable force (enter y at the confirmation prompt)
- Enable the Cloud Agent using the following CLI command: cloud-agent admin-state enable
Starting the Activation Process on Devices
A device must connect to the
OmniVista Cirrus Server to complete the activation process. If it is an unconfigured device (a new device, or an old device that has been reset to the factory default configuration), or a device that supports the Automatic Call Home Feature, just connect the device to your network. Otherwise, connect the device to your network (if necessary) and restart the activation process on the device.
Connecting Devices to Your Network
Connect the device to your network and power
it on. The device will automatically contact the OmniVista Cirrus Server and complete the activation process, if the Network and Device Prerequisites are met.
Restarting the Activation Process
If the device supports the Automatic Call Home Feature, the device will automatically retry the activation process. Otherwise, restart the activation process on the LAN device or AP as described below. The options for restarting the activation process on a device depend on whether you are adding the device for limited management (unlicensed device) or full management (licensed device).
Restarting The Activation Process (Limited Management)
If you are adding unlicensed devices for limited management, restart the activation process as described below.
- LAN Device - Use one of the following options:
- Manually Reboot the Device - Power on and power off the device.
- Restart the Cloud Agent on the Device - Telnet to the device and disable the Cloud Agent using the following command: cloud-agent admin-state disable force (enter y at the confirmation prompt). Then enable the Cloud Agent using the following command: cloud-agent admin-state enable.
- AP - Use one of the following options:
- Manually Reboot the AP - Power on and power off the AP.
- SSH to the AP and Reboot the AP - SSH to the AP and execute the "reboot" command.
- Use the Express UI to Reboot APs - Click on the "reboot" link next to each AP you want to reboot.
When the activation process completes, the Device Status column will display "Registered". If you have trouble activating devices, click here for common problems and troubleshooting tips.
Restarting The Activation Process (Full Management)
If you are adding licensed devices for full management, restart the activation process as described below.
- LAN Device - Use one of the following options:
- Manually Reboot the Device - Power on and power off the device.
- Restart the Cloud Agent on the Device - Telnet to the device and disable the Cloud Agent using the following command: cloud-agent admin-state disable force (enter y at the confirmation prompt). Then enable the Cloud Agent using the following command: cloud-agent admin-state enable.
- AP - Use one of the following options:
- Manually Reset the AP - Press the "Reset" button on the device until the LED starts flashing Red. When the light stops flashing or goes out, release the reset button.
- SSH to the AP and Reboot the AP - SSH to the AP and execute "firstboot" and "reboot" commands.
- Use the Express UI - If the AP Work Mode column on the Device Catalog Screen displays "Cluster", go to the Express UI, select the device(s) you want to add to OmniVista and click on the Connect to OmniVista Cirrus button.
When the activation process completes, the Device Status column will display "OV Managed". If you have trouble activating devices, click here for common problems and troubleshooting tips.
Editing a Device
You can edit the basic information for single device. Note that if a device fails validation due to an incorrect serial number or MAC address (APs only), you can also edit those fields. Also note that you cannot edit multiple devices. However, you can edit the software version for multiple devices by selecting the devices and clicking on the Set Software Version button.
To edit a single device, complete the fields as described below and click on the Update button.
- Serial Number - The Serial Number is displayed. This field cannot be edited.
- Device Type - The type of device is displayed (LAN Device, Stellar AP). This field cannot be edited.
- MAC Address (APs only) - If you enter a Serial Number for an AP, enter the AP MAC address (not required or displayed for switches).
- Desired Software Version - Select a software version for the device.
- Select a Software Version - Select a specific software version from the drop-down. The device will automatically download and install the selected software version as part of the activation process. Note the selected software version must be higher than the version currently installed on the device. Also note that if the device does not support the selected software version, the "Desired Software Version" field will be set to "Do Not Upgrade" after the device is validated.
- Do Not Upgrade - Select "Do Not Upgrade" if you do not want to change the installed software on the device. If the device is part of an existing network, selecting “Do Not Upgrade” will leave your device in its current software version. If this is a new device, updating to the latest release is recommended. In general, you should only select a specific release if you understand the features of the specific release.
- Ready for Upgrade (LAN Device only) - If you set a software version, select whether or not the device will automatically download the specified software during the initial activation process. This field is used primarily to ensure proper configuration of 8.x Devices running AOS 8.6R2 and lower that are part of a VC of 2 or more. If you are adding an 8.x Device running AOS 8.6R2 and lower that is part of a VC of 2 or more, you must perform the steps detailed in the field notes (i) before adding the device.
- Unknown (Default) - When the device calls home, OmniVista determines if it is an 8.x Device running AOS 8.6R2 and lower that is part of a VC of 2 or more. Those devices are flagged to prevent the upgrade until the steps detailed in the field notes (i) are completed. Once those steps are completed, you can edit the device and set the field to "Yes". If OmniVista determines that the device is not an 8.x Device running AOS 8.6R2 and lower that is part of a VC of 2 or more, the selected software version will be downloaded when the device calls home. It is recommended that you set the device to "Unknown".
- Yes - The device will download the selected software version when it calls home.
- No - The device will not download the selected software version when it calls home.
- Initial Geo Location - To use the Topology Geo Map Feature, enter a Geo Location for the device. The device will be displayed in the Topology Geo Map based on the location. You do not have to specify a Geo Location at this time. You can edit the device at any time on the Manged Devices Screen and specify a Geo Location. See the Topology Help for more information on Geo Maps.
- Street Name - Enter a location beginning with the street name, city, etc. (OmniVista will offer suggestions as you type).
- Coordinates - Enter Latitude and Longitude of the Site.
- Initial Site - If you are using the Topology Geo Map Feature, you can select a site from the drop-down menu to place the device in a Geo Map Site. If necessary, click on Add New up the Create Site Window and create a new Geo Map Site. You can then select the new site from the drop-down menu. You do not have to specify a Geo Map Site at this time. You can create Geo Map Sites and place devices in those sites at any time. See the Topology Help for more information on Geo Maps.
Deleting a Device
To delete a device from the Device Catalog, select the device(s), click on the Delete icon, then click OK at the confirmation prompt. The device will be removed from the Device Catalog. If the device(s) was managed, it will also be removed from the Managed Devices Table and the license(s) will be released.
Searching for a Device
You can search for a device by entering search criteria in the Search fields at the top of the Inventory List. Enter any search criteria based on the contents found in the table and the list will change to display only those devices containing the search criteria.
Perform Device Operations
You perform the following operations on devices by selecting a device(s) and clicking on the applicable button at the top of the Device Catalog - Set Software Version, Assign/Release License, Troubleshoot Device, View Activation Log.
Set Software Version
When you click on the Set Software Version button, the Schedule Software Upgrade Wizard appears. You can set an upgrade to occur on the selected device(s) on next "call home", or schedule an upgrade for a future time (including regular recurring upgrades). After completing each section of the wizard, click Next to go to the next screen. Click Finish to set the upgrade.
Set Software Version
- Set Same Software Version for All Devices (same models only) - Select an upgrade software version from the drop-down list to upgrade all selected devices to that software version. If you select multiple devices, the devices must use the same base software. If you select devices that use different software (e.g., OAW-AP1221 and OS6450), "Do Not Upgrade" will be your only option. Select the "Set Different Software Version for Each Device" option. Select "Do Not Upgrade" if you do not want to upgrade the device(s).
- Set Different Software Version for Each Device - When you select this option, selected devices will appear. Under the "Desired Software Version" column, select the upgrade software version for each device. Note that If the selected devices include more than one device of the same model type (e.g., you selected 2 OAW-AP1221 devices and 5 OS6450-P48 devices), the list will only display one device of each model type. When you select a software version for a device, the software will be applied to all selected devices of that model type. Select "Do Not Upgrade" if you do not want to upgrade the device(s).
Note: If you are setting a software version for a Virtual Chassis (VC), select the Master Chassis of the VC or select the Master and Slave Chassis of the VC. Selecting the Slave Chassis without selecting the Master Chassis can lead to unexpected software versions in the VC.
Set Schedule
- No Change to Existing Schedule - Select this option to use the existing schedule for the selected device(s). If a device is part of a schedule, it will be upgraded within the time window of that schedule.
- Choose a Schedule - Select this option to choose an existing Scheduled Upgrade configuration or to create a new schedule.
- Choose an Existing Schedule - Choose an existing schedule from the drop-down menu.
- Create a New Schedule - Enter a Schedule Name and Complete the fields as described below to create a new Scheduled Upgrade. Upgrades are initiated when a device "calls home" during the configured schedule.
- Scheduler Setting - Configure the schedule as described below. Upgrades are initiated when a device "calls home" during the configured schedule.
- Start At - Select the time when you want to begin the upgrade (e.g., 12:00 AM).
- Time Window -The time window for upgrading the devices in the schedule. If a device in the schedule has not been updated when the time window expires, it will not be upgraded for during that scheduled upgrade, but will be upgraded during the next recurrence. Those devices that have already been upgraded will be skipped.
- Recurrence Pattern - Select the interval for a recurring upgrade. Creating a recurring upgrade ensures that all devices included in the scheduled upgrade will be upgraded. If all devices included in the upgrade schedule are not upgraded during the configured time window, the remaining devices will be automatically upgraded during the next recurrence. Those devices that have already been upgraded will be skipped.
- Daily - Upgrade will occur on the schedule day at the configured "Start At" time. By default, the upgrade will occur every day ("Every 1 Day"). You can customize it by clicking on the "Every 1 Day" field and entering a number (Range = 1 - 30 days). For example, you could configure a Daily Upgrade to occur every 2 days if you want it to occur every other day.
- Weekly - Upgrade will occur once a week on the selected day at the configured "Start At" time. Select the day of the week on which you want the upgrade to occur. The upgrade will occur every week on that day at the configured "Start At" time. You can select more than one day to perform weekly upgrades on multiple days of the week.
- Monthly - Upgrade will occur monthly on the configured day at the configured "Start At" time. Select the first radio button to schedule the upgrade for a specific day of the month, and for a specific number of months. By default, the upgrade will occur on the first day of every month ("Day 1 of every 1 Month"). However, you can customize it. For example, you could schedule the upgrade for the 15th day every other month ("Day 15 of every 2 Months").
- Every Weekday - Upgrade will occur every weekday at the configured "Start At" time.
- Range of Recurrence - Select the start and end date, if applicable, for the scheduled upgrade.
- Start Date - Enter the start date for the scheduled upgrade. The scheduled upgrade will begin on that date at the configured "Start At" time.
- End Date - Select "End by" to enter an end date for the upgrade. Select "No end date" to continue the upgrade indefinitely.
Review
Review the devices and schedule that you have configured.
Assign/Release License
Select an unlicensed device(s), click on the Assign License button, then click OK at the confirmation prompt to assign a license to the device(s). Select a licensed device(s), click on the Release License button, then click OK at the confirmation prompt to release a license from a device(s).
Troubleshoot Device
Select a device and click on the Troubleshoot Device button to bring up the Device Troubleshooting Screen. The Device Troubleshooting Screen is used to send commands to network devices to troubleshoot and resolve device problems. You can only select one device at a time.
View Activation Log
Select a device and click on the View Activation Log button to bring up the Activation log for the device. You can only select one device at a time.
Device Catalog Information
The Device Catalog List displays information for all devices known to OmniVista Cirrus. You can click on a device's Serial Number to display the device in the Topology application; or click anywhere on the row corresponding to a device to display detailed information for the device in a condensed format.
Note that if any devices in the Managed Devices List have unsaved configuration changes in their Working Directory, a number will appear in the Notification Icon (Bell Icon) at the top of the screen. Click on the Notification Icon. The number of devices in this condition is displayed. Click on the Save Icon button to save changes to the Working Directories of the devices.
- Serial Number - The device serial number. Note that you can click on a device Serial Number to automatically go to the Topology application, where the device is highlighted in the Topology map.
- Model - The device model (e.g., OS6860-P48, OAW-AP1221).
- Current Software Version - The current software version running on the device (e.g., 8.7.275.R01, 4.0.1.26). The information is displayed in the colors below to indicate the software status. You can also hover over the field or click on the field for more information.
- Black - The device is running the latest software.
- Yellow - The device is running a software version that is different than the "Desired Software Version" configured for the device. The device will automatically upgrade to the "Desired Software Version" the next time it calls home.
- Amber - The device is running an old software version (below the latest version).
- Red - The device is running an old software version that is not recommended by ALE. You must upgrade the device to the latest software.
- Desired Software Version - The "Desired Software Version" version configured for the device. The field will display the software version configured or "Do Not Upgrade".
- Ready for Upgrade - The software upgrade setting for the device. It indicates whether or not the Desired Software configured for the device will be downloaded to the device when it calls home.
- Unknown - A device configured for download can initially be set to "Unknown" when it is first added. Once the device calls home, OmniVista determines if the device can proceed with the download. If so, the software is downloaded to the device and the field is reset to "Yes". If not, the field is reset to "
"No" (e.g., device running AOS 8.6R2 and lower that is part of a VC of 2 or more that has not been configured for download).
- Yes - The software download will proceed when the device calls home.
- No - The software download will not proceed when the device calls home.
- Device Status - The real-time device activation/provisioning status for the device or virtual chassis, if applicable (e.g., Waiting for Validation, Waiting for First Contact, OV Managed). If devices are part of a virtual chassis, the Device Status for each device reflects the activation/provisioning status of the virtual chassis. Device Status error messages/failure states are detailed in the Troubleshooting section with explanations and possible solutions.
- Waiting For Validation - Device information provided is being checked by the OmniVista Cirrus Server.
- Device Validation Failed - Device validation failed.
- Waiting For First Contact - Device has been validated. The OmniVista Cirrus Server is waiting for the device to connect to it. Once the user connects the device to the network, the device will be ready for limited (unlicensed device) or full management (licensed device).
- Obtaining Certificate - Device has contacted the OmniVista Cirrus Server and the server is creating a digital certificate that is used in creating the secure VPN channel between your device and the OmniVista Cirrus Server.
- Certificate Previously Issued - A certificate was previously provided to this network device but it has contacted OmniVista Cirrus without it.
- Failed To Get Certificate - Device has contacted the OmniVista Cirrus Server and the server attempted to create a certificate to achieve a more secure communication but the attempt has failed.
- Registered - Device has successfully registered with the OmniVista Cirrus Server and is ready for limited management.
- Upgrade - Device software version will be or is being upgraded.
- Upgrading - Device is in the process of upgrading its software.
- Upgrade Failed - Device software version upgrade failed.
- Assigned - Device has contacted the OmniVista Cirrus Server and was found to be assigned to your account. The device is in the process of becoming fully managed.
- VPN Configuring - Device is in the process of configuring a secure transport channel for connecting to the OmniVista Cirrus Server.
- Factory Reset Required - The VPN profile was changed/updated. A Factory Reset is required on the device.
- Connected to OV - Device has connected to the OmniVista Cirrus Server over a secure transport channel and will proceed with provisioning, if required.
- Provisioning - Device is in the process of receiving configuration information from the Provisioning application, before it is ready for full management.
- Provisioning Failed - Device was unable to process the provisioning configuration sent by the Provisioning application, or OmniVista Cirrus was unable to discover the device. See the "Last Provision Message" column on the Provisioning Results Screen (Network - Provisioning - Results) for more information about why provisioning failed on the device. See the Troubleshooting section below for possible solutions to the problem.
- OV Managed - Device is ready for full management.
- Unsupported Device Model - The device is not supported in OmniVista Cirrus.
- VC Mixed Accounts Failed - Devices in the Virtual Chassis belong to different accounts. At least one VC Chassis (Master or Slave) belongs to one account, and at least one VC Chassis (Master or Slave) belongs to another account.
- PKI Update - Indicates there are new Public Key Infrastructure (PKI) parameters available for the device on the next call-home. This can include one or more of the following:
- New Device Private Key
- New Device Public Key
- New Device CSR
- New Device Certificate
- Updated CA Signing Chain.
- Device Category - The type of device:
- LAN Essential - OS6350, OS6450, OS6560
- LAN Core - OS6900
- LAN Advanced - OOS6860, OS6860E, OS6865
- Stellar AP - AP
- Device Name - The user-configured device name.
- IP Address - The IP address of the device. Note that OmniVista Cirrus supports duplicate IP addresses for different physical sites. For example, a Tenant may have multiple physical sites, each with its own DHCP Server. In this case, the same IP address may be used in multiple sites (OmniVista Cirrus manages devices based on VPN IP address). You can identify devices with the same IP address by referring to the device Friendly Name or Device Name. If no Device Name was configured for a device, you can identify the device by clicking on the Device's Serial Number to highlight the device in a Topology Map. At this point you could also edit the device to add a Device Name.
- MAC Address - The MAC address of the device.
- Operational Status - The operational status of the device. It displays "Up" if the device is up and responding to polls. It displays "Down" if the device is down and not responding to polls. It displays "Warning" if the device has sent at least one warning or critical trap and is thus in the warning state.
- Initial Site - The initial Geo Location Map Site (if configured when the device was first added).
- Initial Geo Location - The initial Geo Location (if configured when the device was first added).
- VC Name - The name of Virtual Chassis Master or name/serial number and number of switches in the Virtual Chassis, if applicable.
- MAC Address - The MAC address of the device.
- AP Group - The AP Group the device belongs to, if applicable.
- AP Work Mode (APs Only) - The management mode for the AP.
- Cloud - AP is being managed by OmniVista Cirrus.
- Cluster - AP was added to the Device Catalog, but is still in Cluster mode and is not being managed by OmniVista Cirrus. You can move the device to "Cloud" by licensing (if necessary) and restarting the activation process on the device.
- No Mode - AP needs to be rebooted to obtain work mode status.
- Config Status - The status of the current Working Directory on the device (e.g., Saved, Unsaved, Certified, Uncertified).
- Licensed - Indicates whether or not the device is licensed (Yes/No).
- Role During Activation - The role of the device when activated (e.g., Standalone, Master, Slave).
- Approximate Time of Next Call Home - The number of minutes before the device will call home again. By default, devices call home every 5 minutes. Contact Customer Support to change the call home interval.
- Last Call Home Time - The date and time when the switch last called home to OmniVista Cirrus.
- Part Number - The device part number.
- RAP Status - Whether the AP is acting as a Remote AP (Remote AP/No).
- Server's Public IP - The Public IP address of the OmniVista Server, if the AP is acting as a Remote AP.
- AP's VPN IP - The IP address of the AP's VPN, if the AP is acting as a Remote AP.
- Upgrade Schedule - The name of the Scheduled Upgrade to which the device is assigned, if applicable. "Not Scheduled" means the device has not been assigned to a Scheduled Upgrade.
- NaaS/CAPEX Device - The Device License mode of operation for the switch (NaaS, CAPEX, CAPEX Undecided). See NaaS Device Licenses for more information. Note that NaaS device licensing is supported only on switches running AOS Release 8.8R1 or higher.
- OmniVista Network Advisor - Indicates whether or not OmniVista Network Advisor is monitoring the device (Enable/Disable).
- OmniVista Network Advisor Instance - Tthe URL of the OmniVista Network Advisor instance that is monitoring the device. This field is blank if OmniVista Network Advisor monitoring is disabled.
Troubleshooting
If
you encounter problems adding/licensing devices, the
Device Status column in the Device Catalog can be used to troubleshoot the problem. (For a Virtual Chassis, status is displayed in the VC Device Status column.)
Status |
Resolution |
Unsupported Device Model |
- The device is not supported in OmniVista Cirrus.
|
Device Validation Failed |
- You may have entered an incorrect serial number or MAC address. Check the Serial
Number or MAC address (AP). Edit the information, if applicable, and restart the activation process on the device.
- The device serial number is not recognized by the OmniVista Cirrus Database. However, this does not prevent the switch/AP from becoming Registered/Managed. If the switch/AP goes through the Activation process, it will be automatically validated. Restart the activation process on the device. The device should move to “Registered” state (if it was not licensed) or to "OV Managed" state (if it was licensed).
- The device may be configured with the wrong Network Identifier. Go to Administrator - System Settings - Network ID and specify the correct Network ID setting; or update the Network ID in your DHCP server. Restart the activation process on the device.
- Device is sending incorrect Serial Number information in the certificate, probably after modifying the VC/Stack units or breaking a VC/Stack. Apply "cloud-agent remove-inconsistent-certificate" command and restart the onboarding process using the "cloud-agent admin-state restart" command.
- AP Country Code conflict. Wireless regulations vary by country, so APs are configured and shipped based on the country's regulations. The Country Code configured for the AP Group used to manage these APs must match the country code for the APs it is managing. If they do not match, the APs will remain in the Unmanageable Access Point List until the problem is resolved. Check and update the APs Country Code, if necessary.
- AP is in "Untrusted" mode. APs must be licensed and in a "trusted" state to be managed by OmniVista. To place an "untrusted" AP into a "trusted" state, select the AP(s) in the Unmanaged AP List and click on the "Change to Trust Status" icon (circle with checkmark) at the top of the screen and click OK at the Confirmation prompt. The AP will be moved to the Managed AP List.
|
Waiting for First Contact |
|
Registered |
|
VPN Config Failed |
- Device was unable to configure a secure transport channel for connecting to the OmniVista Cirrus Server. Wait for 30 minutes. The network device will automatically contact the OmniVista Cirrus Server again to check the configuration. If resolved, the activation process will continue. If the problem persists, contact Customer Support.
|
Provisioning Failed |
- Device was unable to process the provisioning configuration sent by the Provisioning application, or OmniVista Cirrus was unable to discover the device. See the "Last Provision Message" column on the Provisioning Results Screen (Network - Provisioning - Results) for more information about why provisioning failed on the device. Ensure the provisioning configuration is set up properly in OmniVista Cirrus. For LAN Devices, go to the Provisioning application (Network - Provisioning); for APs, go to the AP Registration application (Network - AP Registration). Wait for 30 minutes for the network device to retry and contact the OmniVista Cirrus Server. If the problem persists, contact Customer Support.
- Unable to login to switch with the credentials specified in the Management Template.
- Check the Management Template to see if "Use existing credentials" is checked and that the credentials provided are correct.
- Failed to open an SSH session to the device.
- Try to restart the device to make sure the maximum number of SSH sessions has not been exceeded. There may have been a connection timeout. Check the network connection and try again.
- An error occurred when copying the Configuration File to the device.
- Check the network connection and try again.
- An exception occurred when applying the configuration to device.
- Check the network connection.
- Check the configuration template.
- See the "Last Provision Message" column on the Provisioning Results Screen (Network - Provisioning - Results) for more information if there is an ERROR command.
- Connection is closed by a foreign host.
- Check the connection to device and try again.
- Failed to open a connection to a device.
- Make sure t username or password are correct. Check your user configuration on Other Access Methods.
- AP Country Code conflict.
- Wireless regulations vary by country, so APs are configured and shipped based on the country's regulations. The Country Code configured for the AP Group used to manage these APs must match the country code for the APs it is managing. If they do not match, the APs will remain in the Unmanageable Access Point List until the problem is resolved. Check and update the APs Country Code, if necessary.
- Untrusted AP
- APs must be licensed and in a "trusted" state to be managed by OmniVista. To place an "untrusted" AP into a "trusted" state, select the AP(s) in the Unmanaged AP List and click on the "Change to Trust Status" icon (circle with checkmark) at the top of the screen and click OK at the Confirmation prompt. The AP will be moved to the Managed AP List.
- AP License Conflict.
- If there are no licenses available for a registered AP, you must free up licenses by deleting an AP or purchase additional license before you can manage the AP. Once this is resolved, you can move the AP to the "trusted" state and manage the AP with OmniVista.
- AP Registration Information is Incorrect (e.g., P Address, SysOid).
- Verify and update the information, if necessary.
|
Failed VC Mixed Accounts |
- The VC devices reported by the VC Master Chassis belong to multiple OmniVista Cirrus Accounts. If you or your organization own these OV Cirrus Accounts, consolidate the VC devices under a single account and wait for 30 minutes or restart the activation process on the VC (convert to link). If the problem persists, contact Customer Support. Applicable only to OmniSwitch Virtual Chassis (VC).
|
Certificate Previously Issued |
- A certificate was previously provided to this network device but it has contacted OmniVista Cirrus without it. Remove device and add again to Device Catalog (fix wording); then, wait for 30 minutes or restart the activation process on the device (convert to link). If the problem persists, contact Customer Support.
|
Failed to Get Certificate |
- Device has contacted the OmniVista Cirrus Server and the server attempted to create a certificate to achieve a more secure communication but the attempt has failed. Wait for 30 minutes. The network device will automatically contact the OmniVista Cirrus Server again. If resolved, the activation process will continue. If the problem persists, contact Customer Support.
|
Upgrade Failed |
- Device software version upgrade has failed. OmniVista Cirrus will attempt to fix this internally; however, if the problem requires action outside of OmniVista Cirrus, the default admin of the OmniVista Cirrus Account will be contacted. If the problem persists for more than 24 hours, contact Customer Support.
|
Factory Reset Required |
|
Remote Access Points
You can configure an offsite, remote AP as a Remote Access Point (RAP) that can be managed by a local OmniVista Enterprise installation through a VPN Tunnel. You must first install a VPN VM (see the Remote Access Point and VPN VA Installation Guide for installation instructions). You then add AP(s) using a “Freemium" version of OmniVista Cirrus, the cloud-based version of OmniVista. When the AP(s) is connected to the network, it automatically contacts the OmniVista Cirrus Activation Server, which downloads the necessary IP and VPN configurations so the AP can be added to your List of Managed Devices and managed by your local OmniVista Enterprise installation.
The sections below detail creating an OmniVista Freemium Account and adding Remote Access Points.
Creating a Freemium Account
Remote Access Points are added to the Device Catalog using an OmniVista Cirrus Account. Follow the steps below to create a Freemium Account, then add the Remote Access Points to the Freemium Account Device Catalog.
1. Go to the OV Registration Portal.
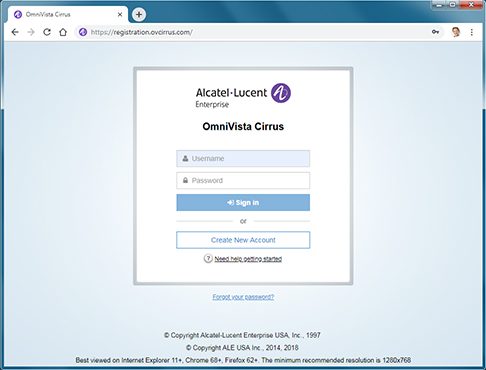
2. Click on the Create a New Account button. The Create New Account Screen will appear.
3. Complete the fields. Fields marked with an asterisk (*) are required. At the bottom of each screen, click Continue to move to the next screen. Note that the username you enter will be used to log into OmniVista Cirrus once your account is created. Also note that the e-mail address you enter will be used to verify your account and complete the process. When you have completed and reviewed all of the fields, accept the terms and conditions and click on the Create Account button. A Confirmation Screen will appear.
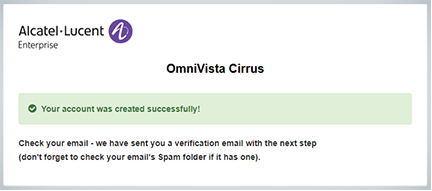
4. Go to the e-mail account you entered in Step 3 above. You will receive an e-mail from ALE USA Inc (noreply@ovcirrus.com) containing instructions and a verification link. Click on the Go to Verify Account link. The Set Password Screen will appear.
Important Note: There is a link in the body of the email to download the required device OS software for OmniVista Cirrus. Devices must be running a minimum software version to connect to OmniVista Cirrus. Click on the link to download the software. If necessary, you can use this software to upgrade your devices. See Device Prerequisites for more information.
5. Create and confirm your password, then click on the Save button. The Confirmation Screen below will appear.

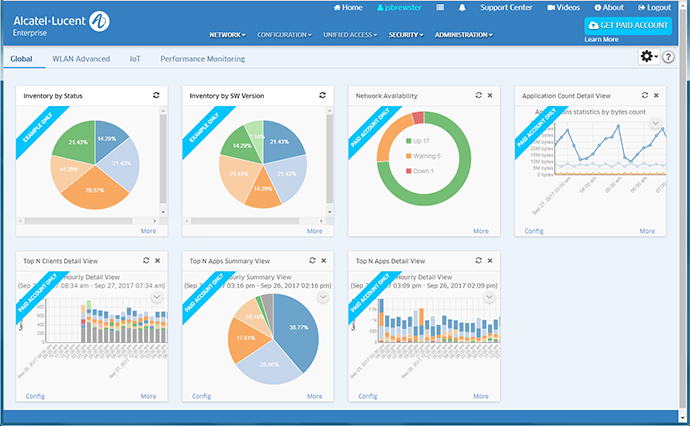
6. Click on the Continue to Login Page link and log into OmniVista Cirrus using the username and password you created. After successful login, the OmniVista Cirrus Freemium Dashboard will appear.
Note: You will continue to log into https://registration.ovcirrus.com using the username and password you created to access your OmniVista Cirrus Freemium Account.
Adding Remote Access Points
After creating a Freemium Account, follow the steps below to add Remote Access Points.
1. Select Network - Inventory - Device Catalog to bring up the Device Catalog application.
2. Click on the Add icon (+) in the upper-right corner of the screen to bring up the Add a Device Screen..
3. Enter the AP Serial Number, then enable the Is this a Remote AP Field to open the Remote AP configuration fields.
.
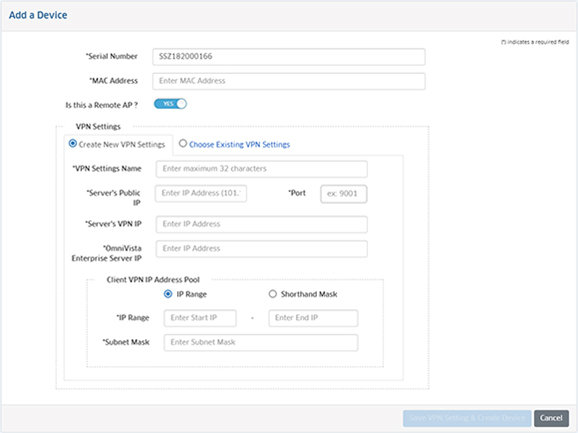
4. Complete the fields as described below, then click on the Save VPN Settings and Create Device button to add the AP to the Device Catalog.
- MAC Address - The MAC address of the AP.
- Is This a Remote AP - Click the slider to "Yes".
- VPN Settings - The VPN Tunnel configuration between the VPN Server and the OmniVista Enterprise Server. Select the Create New VPN Settings radio button to initially configure a Tunnel. Once you configure and save Tunnel Settings, they are saved under the VPN Settings Name and you can simply select Choose Existing VPN Settings to select an existing VPN configuration when adding Remote APs.
- VPN Settings Name - User-configured name for the VPN configuration.
- Server's Public IP - The VPN Server's Public IP address (configured when you installed the VPN VM). This is the IP address used by Remote APs to connect to the VPN Server. And this is the interface through which traffic originating from inside the Enterprise Network flows to the Remote site.
- Port - The VPN Server Port.
- Server's VPN IP - The VPN Server's Private IP address (configured when you installed the VPN VM). This is the interface through which traffic originating from the Remote AP flows to reach a destination inside the Enterprise Network.
- OmniVista Enterprise Server IP - The IP address of the OmniVista Enterprise Server that will manage the devices.
- Client VPN IP Address Pool - The range of addresses available to assign to Remote APs.
- IP Range - Enter a starting and ending IP address range.
- Shorthand Mask - Enter a shorthand mask for the IP Range
- Subnet Mask - Enter the subnet mask for the Client VPN IP Address Pool.